🔗 Extend your reach, sharpen your edge.
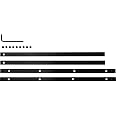
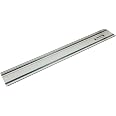
The Makita P-20177 Guide Rail Connector Kit features durable steel connectors designed to join multiple guide rails, enabling longer and highly accurate straight or bevel cuts. Compatible with Makita’s 118", 55", and 39" guide rails as well as select competitor rails including Festool, this kit ensures quick installation and long-lasting performance for professional-grade precision.


| Manufacturer | Makita |
| Part Number | P-20177 |
| Item Weight | 7.5 ounces |
| Product Dimensions | 1 x 1.5 x 14.75 inches |
| Item model number | P-20177 |
| Is Discontinued By Manufacturer | No |
| Material | steel |
| Voltage | 18 Volts |
| Item Package Quantity | 1 |
| Number Of Pieces | 1 |
| Included Components | (2) Guide Rail Connector |
| Batteries Included? | No |
| Batteries Required? | No |
A**E
Essential if you want to break down full panels.
These are great for using to extend the base 55" track that comes with the Makita plunge saw. Very stable and easy to put on and off.
B**R
Rail extneders review
Makes a very nice solid connection
G**C
Best connector for my Makita track saw guides
After seeing how these compare to the Festool connectors I believe these are superior. TheseMakita connectors are two parts verses the Festool one part connectors. This means that the locking set screws push the two pieces apart to lock the connectors in place unlike the Festool design where the set screws push directly into the guide rail and potentially damage it. I totally recommend these Makita connectors.
T**J
2-piece design saves track surfaces
The 2-piece design allows the set screws to press against the bottom part of the connector rather than against the relatively soft aluminum track. Seems a lot to spend but I think they're worth the price.
D**M
It works, but felt kinda like winning a raffle
Important things first: it works. Yeah, there was an issue with threads, they weren’t clean enough. I didn’t had a tap, so I took a setscrew from the set (there’s an extra one) and carefully run it all the way through the thread making 3/4 a turn forward and a 1/2 backwards, adding a drop of oil into every hole. If you try it, make sure you start from the correct side - the one opposite to small indented tabs.I shouldn’t be doing this for a 50$ set that essentially is 4 holes in a steel bar (hey Makita, you had just one job with this one)Other than that it worked. I couldn’t find any instructions on Makita website, but YT came rescue. Two parts of rails aligned perfectly, the connection was straight and rigid. It would be just awesome if Makita would add a few inches to every rail, so that a standard 55” rail + the short one would give 8’, but yeah, gotta make those sales numbers somehow.
N**K
Great!
Great!
C**G
No instructions
No instructions but YouTube “University” has a video as to how to put the pieces together. Makita could have put an explanation of which rod went on top and which rod went on the bottom.
I**N
Completely Unusable Waste of Money
Where do I even begin? Opened the package to find 2 bent rails with threaded holes that appear to have been drilled with the bit in reverse and without a care in the world for hole location. The connectors also appear used, with obvious scratches and wear marks all over each of them. My order came with a 3rd thin connector, and only 1 grub screw. You’d think it would be hard to mess up a few strips of metal this badly, but Makita found a way. The quality “control” is laughable at best. Completely unusable, and will be returned immediately. Save your money.
Trustpilot
2 weeks ago
2 months ago