💧 Upgrade your wash game with LG’s precision water valve!
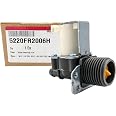
The LG 5221ER1003A Water Inlet Valve Assembly is a genuine OEM replacement part designed to control water flow into LG washing machines. Built with premium materials for durability and exact fit, it ensures reliable performance and easy installation, backed by a 90-day warranty.

| Material | Plastic |
| Brand | LG |
| Item dimensions L x W x H | 4.5 x 4 x 4.4 inches |
| Inlet Connection Type | Waterproof |
| Outlet Connection Type | FIP |
| Number of Ports | 2 |
| Valve Type | Water Inlet Valve |
| Global Trade Identification Number | 00191175000763, 00749853110039 |
| Manufacturer | LG |
| UPC | 191175000763 749853110039 |
| Part Number | 5221ER1003A |
| Item Weight | 10.4 ounces |
| Product Dimensions | 4.5 x 4 x 4.4 inches |
| Item model number | 5221ER1003A |
| Is Discontinued By Manufacturer | No |
| Size | 4.5 x 4 x 4.4" |
| Color | Beige |
| Item Package Quantity | 1 |
| Included Components | LG 5221ER1003A Genuine OEM Water Inlet Valve Assembly for LG Washing Machines |
| Batteries Included? | No |
| Batteries Required? | No |
| Warranty Description | 30-day returns / 90-day defective returns. |
P**B
Perfect replacement part
I bought this to replace a part on a family member's washing machine. Perfect replacement.
C**G
Same parts as original
It matched according to the specifications
C**D
LG washer machine
Working just fine
K**H
Works!
Fixed my LG that was (original part) leaking. Looks authentic (it's Amazon...so that's a problem) and installed very easily.
N**E
Fantastic! Fits LG WM3370HWA
When I saw water leaking out from under my LG washing machine, I was riddled with anxiety. Yet another costly repair in an unending series of issues related to home ownership. But instead of immediately calling the repair guy and spending hundreds of dollars on a repair, I googled around, opened up the top of the machine and saw that this is an insanely common issue with these front load LG washers (LG WM3370HWA). I watched about 10 youtube videos on replacing this part and found it here on Amazon for $26. I ordered it, it came early the next morning, I braced myself and started my attempt to repair (sure that I would screw it up). Incredibly, I was able to remove and replace the part and put everything back together in under 30 minutes! I saved a ton of money, accomplished something, and gave myself a nice little boost of confidence! If you can use a screw driver and have enough strength to move the washing machine away from the wall, you too can do this! My machine is running great and the leak is gone! Highly recommend you try this before hiring a repairman or buying a new machine.
P**A
perfect fit part
fixed my leaking washing machine myself
2**6
Perfect fit for LG WM4270HVA but Loud (water hammer)
We began to notice our 8+ year old LG WM4270HVA washing machine had some water start coming into the tub after running cycles. The longer the washing machine sat without use, the more water would be in the tub. After doing some digging, the issue was this cold water inlet valve or the hot water inlet valve (we replaced both inlet valves). The cold water inlet valve had some fine sand in it.After replacing, no longer do we have any water issues coming into the tub water running cycles. The part was an exact fit. The inlet valve when opening and closing however is much louder than the original valve. Makes a pretty solid bang/clank sound (water hammer). Will see if this has a long term concerns or if the valve opening/closing sound improves over time. Update - we installed two Sioux water arrestors on the back of the washing machine, the water hammer noise is now unnoticeable.The inlet water replacement doesn't take more than 10 to 20 minutes. It's quite easy. There are YouTube videos on how to do it.
D**T
Perfect replacement part
Installs easily, tighter than the original, which would twist slightly while tightening on the water line.You probably already know how to access this to change it, but if not:1. Unplug washer, turn off water supply and remove water hose from the cold inlet.2. Remove the 2 screws located in the main washer body on the back-top of the machine that fasten the top to the main washer body.3. slide the top back, then lift up and off.4. Unplug the 3 electrical connectors from the old part5. Using pliers, squeeze the hose clamp on one of the interior hoses and slide it back6. Using pliers, lightly grip the hose where it is connected to the old part and give it a little twist7. Pull the hose off of the old part (use your hand here. Pliers could damage the hose and cause further leaking)8. On the new part, connect the hose to the same place it was removed from the old.9. Repeat 5-8 for the remaining hoses.10.From the back of the machine, remove the 2 screws on either side of the cold water inlet.11. pull out the old part12. put in the new part13. From the back of the machine, replace the 2 screws on either side of the cold water inlet.14. reconnect the 3 electrical connections.15. reconnect the cold water inlet hose and turn the water supply back on16. check for leaks17. Plug the washer back in18. Start a wash cycle and check for leaks. Once you are satisfied, stop the cycle.19. Do the reverse of step 320. Do the reverse of step 2
Trustpilot
1 day ago
2 weeks ago