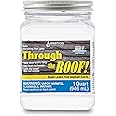
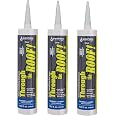
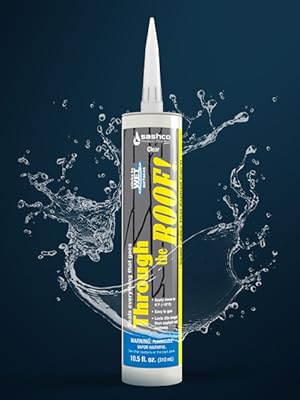
🏠 Seal the Deal with SashcoQuart!
SashcoQuart Clear Roof Sealant (14003) is an ultra-clear, elastic sealant designed to withstand temperature fluctuations and UV exposure, ensuring long-lasting protection for your roof. It adheres to most existing patches, is paintable, and remains effective even in unheated environments.
R**A
Works great!
Had a leak around our fireplace chimney and just couldn’t seem to seal it until we tried this. Tried several different methods of sealant but they didn’t last very long, a few months at best. Used this and it stopped the leaking immediately.Definitely has saved a roof replacement for a while.
D**N
Read These 10 Tips to Get the Best Results-Fantastic Product!
This stuff is amazing: it's like silicone sealant that you apply with a brush. It's slightly thinner than silicone, so that you can easily brush it flat over a large area, but plenty thick enough to stay put when you brush it into cracks, grooves and gaps. I was particularly pleased how well it adhered to the irregular roof surface (asphalt shingles, flashing, and roof cement used for previous patches). Some of the shingles were damp, which didn't affect adhesion at all. The directions say you can apply this when it's raining, but I waited until there had been no rain for about 12 hours.Here's how to do a perfect job:1. Buy a package of foam brushes like these: 20-Piece Foam Brush Set, 2-Inch . 2 inches is the perfect width: narrow enough not to collapse when you push the sealant hard into cracks, but wide enough to spread nice layers of sealant over big flat surfaces. I used two foam brushes per quart: when one starts to self destruct from brushing into cracks and against rough shingles, toss it and grab a new one.2. I used a leaf blower to remove all the leaves quickly.3. For cleaning the roof, you also need a hand brush like this one: Rubbermaid Comm Prod 6342-00-SILV 8" Comm Counter Duster , or one that comes with a brush and dustpan set (you don't need the dustpan.) This is the ultimate tool for cleaning the roof, because it gets rid of all the loose stuff. That's the only cleaning you need to do: get rid of the loose dirt, stone granules and leaves. Make sure to keep the brush away from the sealant! I tried using a broom at first, but it didn't clean into the little cracks, which the whole reason I was up there. This hand brush works better. A paint brush could work as well.4. USE RUBBER GLOVES! This stuff is SUPER STICKY. It is much tougher to get off your hands than silicon caulk. Also wear old clothes...and resist the urge to wipe your hands on your pants! I brought a rag for wiping.5. The directions say you can spread a layer 1/8-1/4" thick (3-6 mm). I think if you spread a 1/4" thick layer, you are probably being sloppy and making a mess. 1/16"-1/8" (2-4 mm) is a good guideline.6. Start at the visible cracks, and jab the sealant into the crack with the brush, then wipe sideways to fill the crack with sealant. It will stay where you put it, but the best way to get a good seal is to embed the sealant deeply into cracks, then brush a nice smooth layer over the top.7. In some cases, you will be applying over previous sealant like black roofing cement. In my case, there were visible cracks several inches long in the old roofing cement patch. After sealing all the visible cracks (see #6 above), I painted a smooth layer over ALL the visible roofing cement, plus two inches or more beyond. If some of the old roofing cement patch is cracked, the rest will crack within a few years, so seal it now!8. I had trouble removing the last bit of sealant from the jar. The foam brushes are a bit too short and too weak to scrape from the bottom corners. A paint stirring stick might help here.9. Bring a trash bag with you onto the roof. As you finish with brushes and jars of sealant and rags and gloves, throw them immediately into the trash bag. Wipe your gloved hands on the inside surface of the bag. Carefully haul the bag straight to the trash can when you are done. You REALLY want to keep this stuff off your clothes, shoes, etc. and because it is clear, it is a bit harder to notice than black roofing cement.10. I purchased two quart jars to seal around four roof vents. If you are going to the trouble of sealing the roof, buy plenty. I may buy the gallon size next time, but I'll always keep a quart jar around for emergency repairs.
A**R
Seals and stops leaks
Very easy to apply to area, works as intended. Is very messy so wear clothing that you really don't care to mess up. Applied morning of a bad thunderstorm and it held up well.
A**S
Good Results
I am experiencing very good results with this product. Used it to seal the lanai aluminum seam that was leaking due to the prior caulk cracking. Used heat gun to remove old caulk then put this down. It had good adhesion and is handling the heating expansion of the metal during the day followed by cooler temps at night. I think this is going to last a good long time.
S**N
Excellent product.
Easy to apply. Used on metal roofing and my boat.
J**R
Gallon of perfection
The viscosity was that almost like pudding. I poured a generous amount into the valleys on my homes roof, then smoothed it out with a foam brush. I do not recommend using a foam brush with this as the asphalt shingles are quite abrasive. In hindsight I should have used a 3 inch paint roller. The product did what it said and I have no more leak coming in. I also like the fact it's clear, which was the primary reason for purchasing it. I would definitely recommend this.
J**R
Better than standard roofing cement for repairs. This stuff works!
So I purchased 4 quart containers of this sealant a few years ago with intentions to do some repairs that were actually not necessary following some roof reconstruction. That said, this stuff sat in my shed for around 4-5 years before I had a chance to use it (not climate controlled - full swing of weather in the NE). I was afraid that like caulk tubes this very expensive purchase would be a loss but I was pleasantly surprised to find that all 4 containers stayed viable!I had a small leak in my roof SOMEWHERE that I could not pin down. I decided to just hit every possible infiltration point with this sealant and see (roof vents, waste line vents, a few cracked shingles, etc.). Well, one of the spots I hit must have been the leak point because months later there's no further leak evidence even following some pretty horrific rain storms.I am so happy with the results that I wanted to share a few things I learned while using this sealer.1) I see a lot of people recommend foam brushes for this stuff, but I would counsel getting short utility paint brushes instead. My asphalt shingle roof would have shredded the foam brushes and the traditional bristles of the utility brushes I purchased let me really get into the cracks with the sealant. Also - the bristles are a bit stiffer than many foam brushes - good for getting the last of the sealant out of the jar, especially as it starts to cure.I used a 2" wide brush (with 1" long bristles) which just fit into the mouth of the quart jar. I got a box of these things for peanuts a long while ago and still haven't run out of them.2) A note about the curing... some other reviewers mentioned getting gallon containers instead of the quart size containers. Do this ONLY if you are going to use this stuff all at once and relatively quickly. I was very careful to recap my quart jar as I moved about the roof and I still barely got to the bottom of the container before it started to gel up to the point it became unusable. Unless you have a big project, get a bunch of quart size jars so that the most you will use/lose per job is one quart.Plan your job ahead of time so that you will spend the least amount of time after jar-open.3) Plan to lose what you don't use. I carefully re-capped what little I had left in the last quart jar I was using - even did the "breathe into the jar for CO2 layer" trick and the stuff still completely cured within hours. Once air gets into the jar the timer starts ticking.4) Be careful cleaning up. I got this on my extension ladder, jeans, shirt, shoes, etc. I was wearing work clothes and work gloves so no problem there, but you would NOT want to get this on anything you care about. One unexpected bonus - the work gloves I was wearing now have a water resistant side - the sealant coated the palms and fingers of the work gloves and they are still flexible and workable!5) Be aware that this sealant is somewhat shiny when cured - so if your roof is visible from ground level, the repair patches will be noticeable if you're looking. It's not "ice in the sun" shiny, but on an asphalt roof it stands out. I don't care because anything was worth nailing that leak, but it's something to take into consideration.The net sum is that this sealant really works, sticks to anything and everything, and is still pliable and well adhered almost a year later after being applied to a swept but weathered roof in full exposure to the elements. I can only hope that it lasts until it's time to re-shingle the roof again.
Z**.
It works.
I used this to touch up wind-worn shingles. Seems to work well and is easy to apply; it is quite thick like runny honey.
J**.
Worked awesome to fix my Suntuf roof panels!
This stuff is great - we had a leaky Suntuf roof and used this to seal the joints. Easy to put on, dried clear so you can't see it and now we're leak free! Except for the spot I missed, but that's my fault and not the product. =)
F**E
This will waterproof a damaged roof even when hot or wet.
This was recommended to me by a contractor when I needed to waterproof a roof from which shingles had blown off. It lasts a long time and is clear so it is not obvious. It has got the roof through periods when it is too wet, cold or slippery to repair.
P**L
Good stuff
Did a roof repair and it held up. Easy to work with…
G**E
Great product with quick delivery! Thank ou.
Very good product and well packaged for delivery.
Trustpilot
1 month ago
1 day ago