🚀 Elevate Your Game: Work Smart, Not Hard!
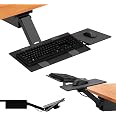
The Uncaged Ergonomics KT2-b Under-Desk Adjustable Height & Angle Sit to Stand Up Keyboard Tray is designed to enhance your workspace with its adjustable features, allowing for a seamless transition between sitting and standing. With a load capacity of 17 pounds and an independently adjustable mouse pad, this durable keyboard tray promotes better posture and productivity, making it an essential addition to any modern office setup.
| Finish Type | Powder Coated |
| Shape | rectangular prism |
| Base Type | Leg |
| Assembly Required | Yes |
| Load Capacity | 17 Pounds |
| Number of Levels | 1 |
| Special Feature | Swivels, Slides, Always-Level Mouse Pad; Perfect for Standing Desks |
| Global Trade Identification Number | 00820103873291 |
| Manufacturer | Uncaged Ergonomics |
| UPC | 820103873291 |
| Item Weight | 18 pounds |
| Product Dimensions | 27 x 5 x 10 inches |
| Item model number | KT2-b |
| Is Discontinued By Manufacturer | No |
| Material Type | Alloy Steel |
| Number of Items | 1 |
| Manufacturer Part Number | KT2-b |
G**O
Great product, does what it is supposed to in both sitting and standing positions
I found this better than the 3M or Mount It brand because the track was not too deep that it would extend beyond the depth of my desk as were the other 2 brands which stretched nearly 1/3 of their lengths beyond my desk depth and also KT2 is relatively lighter and more compact which is a good thing when it comes to installation.I also felt the KT2 customer service much more helpful when I called them to ask about how to install this on my desk which is a custom desk with a LIP extension in the front because of which the normal installation process of the track for this will not work. They promptly responded and gave me different alternatives such as buying a KT2 metal bridge . However since the depth of my custom desk Lip (2.5 inches) was more than the depth of their bridge (1.75 inches), they had their technical team send me alternatives such as building my own Wooden custom bridge for the depth I needed to clear the front lip extension of my desk which was about 2.5 inches . So based on their pictures they sent me, I did some measurements and brainstorming with the folks at HomeDepot, got the required Lumber and hardware and installed the bridge using liquid nails and 3" screws and then installed the KT2 Sit-n-stand Ergonomic key tray to the bridge using the screws that came with it as shown in one of the pictures I have attached. The process was timeconsuming mainly because I had to come up with a solution for the bridge since my Desk is a customized desk that is not ready for a keyboard tray without building the bridge.Only issue with the unit was since there is no padding at the end of the mousepad tray the Mouse can slide off in a slope configuration, so I created my own custom barrier for the mouse pad by taping 2 pencils as you can see to the mouse pad tray and now everything is cool. The keyboard does not slip unlike the mouse on a slope configuration because the tray comes with a couple of slip resistant rubber strips attached to it.Now that I have installed I am able to work peacefully without having to crouch over or bend my neck or stretch my neck towards the computer monitor to the point of pain as I was doing before installing this keyboard tray. I love both the sitting and standing positions of the keyboard tray as I can easily move it up and down and forward and backwards.Overall the KT2 sit n stand computer keyboard tray looks simple and slick and is a great product with good customer service that saved my day and I wish I had bought it few years earlier instead of straining my neck with some other unfriendly keyboard tray arrangement I had earlier. Since I just installed it a month ago, I just hope the KT2 lasts a long time for the effort I have put in to install and if that happens then I am a happy camper.
E**N
METAL DEATH TRAP!!!! DONT WASTE MONEY!!
Do NOT spend money on this. The screws to install the base plate are TOO short. I was concerned but figured Id see how it worked. The base plate was installed and I put the metal arm in. Screwed the keyboard tray in. When you get to the mouse pad area, the bracket holes are too small to accept the screws they provide and secure it. At the same time that I'm SITTING UNDERNEATH trying to figure out this stupid mouse pad bracket the entire things FALLS ON TOP OF ME. And shreds the underside of my desk. It is super HEAVY metal and it just dropped with no pressure or force or ANYTHING. I was examining the mouse pad with my eyes!!!! Ouch.It is NOT easy to install. The directions are ridiculous.IT IS NOT sturdy. It strips your desk underneath.You've been warned y'all.
N**N
Inadequate instructions, hard to assemble. Might be good once it's together.
I think I will enjoy this product. I certainly hope I do, taking into account what a raging pain in the (expletive deleted) it was to put it together.The "instructions" have a picture of the included parts... which is incorrect.Steps 3 and 5 were already done, so I had to undo step 5 so that I could get A and B apart and start at step 1.The steps are pretty straightforward, until you get to 6, which tells you to use the screws and nuts that come in the little baggy. Unfortunately, there are two little baggies of screws and nuts, which are not labeled and look ALMOST identical. You get to try them each and find which one fits into the holes. Once you have successfully deduced which set to use, you just pop the screws in and then put the washers and nuts on the other side. (I'm assuming this is what the washers were for, as they are not in the parts list or instructions.) Putting the washers and nuts on is really easy... IF you happen to have three hands, some tools, and eight inch long quadruple-jointed fingers. It's incredibly difficult to reach in where you're supposed to, and it took a really long time and a lot of swearing. Finally, after all that, it's on to stage 7.Step 7 "The mouse pad attaches to the right or left side of the keyboard tray". At this point you use your magical powers to contact the spirit of the engineer who died in your house so that he can tell you HOW the mouse pad attaches to the keyboard tray, 'cause the instructions don't bother. Being a semi-intelligent person with part of a college degree, I theorized that this was the reason I had two unlabeled baggies of screws and such, instead of just one. What do you know? Those screws were much easier to deal with, though they still required strange wrench contortions and curse words.Steps 8, 9, and 10 tell you how to adjust the new hardware you have installed. Okay, pretty good.The big stick-on rubber piece might not actually belong here, since it's also not in the instructions... However, it's the same size as the mouse pad, so that's where I stuck it.After the long, drawn-out, incredibly joyful experience of putting this thing together, I was too... tired (and stressed out) to deal with actually trying to use the thing. It had better kick ass.
D**S
The Tray and Arm is nice but the keyboard and mouse platform.
The Tray that mounts to the bottom of your desk is sturdy. The arm which slides out is as sturdy as can be expected for something that rotates, I have no problems with that; however, the platform the keyboard mounts to is like a think cutting board (have you seen those warp before?) and the mouse platform connects directly to the keyboard platform which makes that the least sturdy of all.I bought two of these, I am planning on going to the local hardware store and buying a thick piece of wood (the length and depth of the keyboard and mouse platform) and some longer bolts. I will lose the adjustability of the mouse platform but I will gain a solid platform. I just did not like having to spend extra money to make this usable for me.
Trustpilot
2 weeks ago
3 days ago