


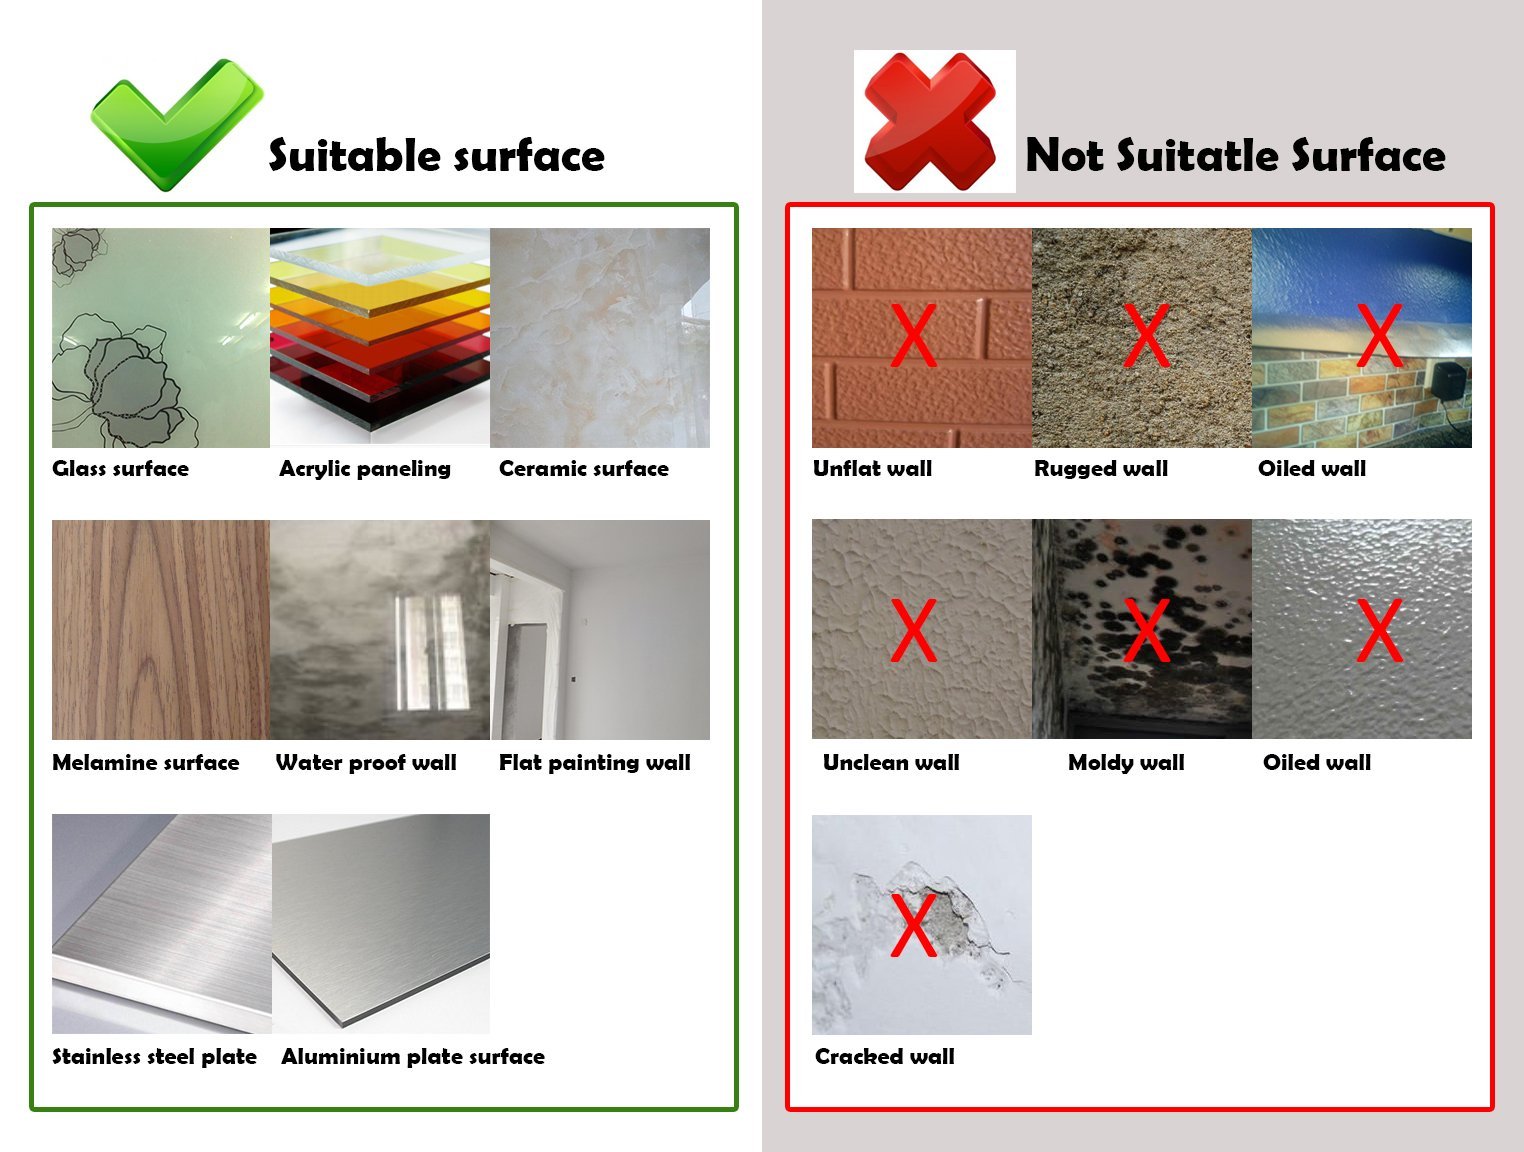

✨ Stick to Style, Stick to You! ✨
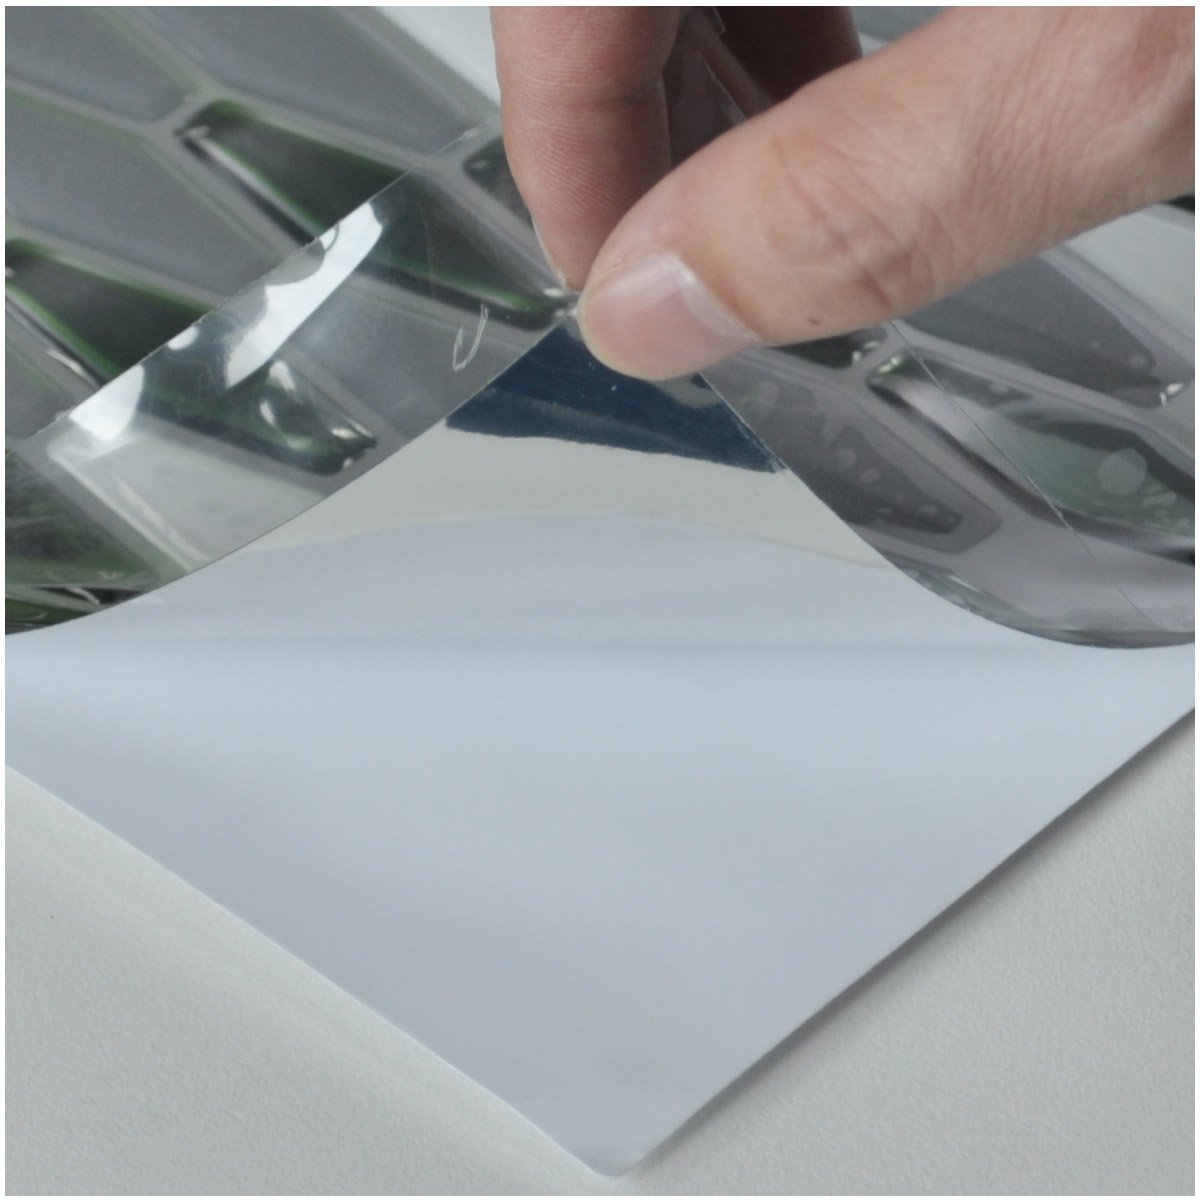
The Art3d Peel-N-Stick Kitchen Backsplash Wall Tile is a stylish and practical solution for home improvement. Each pack includes six 12" x 12" tiles, covering 5.7 square feet, made from durable polyurethane material. With easy peel-and-stick installation, these tiles are heat and humidity resistant, making them ideal for kitchens and bathrooms. Transform your space effortlessly while enjoying a modern, chic aesthetic.
| Brand | Art3d |
| Material | Polyurethane (PU) |
| Size | 6-Sheet |
| Color | Gray |
| Finish Type | Painted |
| Style | Diamond |
| Installation Type | Peel and Stick |
| Product Dimensions | 12"L x 12"W |
| Pattern | Square |
| Shape | Hexagonal |
| Unit Count | 6.0 Sq Ft |
| Item Display Dimensions | 12 x 12 x 12 x 0.06 inches |
| Recommended Uses For Product | Wall |
| Coverage | 5.50 Square Feet |
| Special Feature | Heat Resistant |
| Manufacturer | Art3d |
| Part Number | A17017P6 |
| Item Weight | 1.17 pounds |
| Country of Origin | China |
| Item model number | A17017P6 |
| Is Discontinued By Manufacturer | No |
| Finish | Painted |
| Item Package Quantity | 1 |
| Number Of Pieces | 6 |
| Special Features | Heat Resistant |
| Included Components | No |
| Batteries Included? | No |
| Batteries Required? | No |
| Warranty Description | 2 year manufacturer. |
C**Y
Worth the time
At first like many other reviewers I noticed it was not white but off white so I was a little nervous. When I got halfway finished and passed the outlet and stepped back to take a look at it I loved it. It looked like tile and I was shocked. It is easy but you must take your time especially when going around the outlet, that took me so much time because I did not want to take it off. Also the corners where you will need to make a cut. I used two packs and I loved the out come.
B**T
Was easier than I expected and looks amazing
This brought new life to my super boring kitchen! This was much easier than I thought and was really worried about taking on this project but I'm glad I did. Here is what I did.Preparation was sanding the painted wall smooth and remove the old nasty sealant from the top of my counter-top. Used a power sander and the ALLWAY TOOL CT31 3 in 1 for caulk removal and smoothing of new caulk once applied (after the back splash was put up). This took a while to get that nasty gummy old sealant up. Once finished sanding I cleaned up my mess and wiped down the walls with light soap and water towel ensuring all the dust particles were up.Once completely dry, I used a cheap little black and decker laser level to make sure my line was straight. This didn't help me much since my counter top wasn't exactly level but it did provide me with a guide. I still measure out a few random points and marked them with a pencil to ease my OCD.Using an large Amazon box cut open and spread across the floor with trash bags around it I got my first 12x12 back-splash tile and removed the backing. Holding it low and close to the old Amazon box I sprayed it with 3M adhesive spray (recommended from the included instructions). This might be a no brainer but I'll throw it out there cause I did it.....I cut the staggered ends off one tile (the first tile) and place that one on the wall cause the next tile you place will overlap the first one. I just put the first tile on the wall and didn't consider the placement of the next. Staggered end will overlap the previous tile.Continued to place tiles against the wall one after another doing my best to keep them level. Don't worry if you get a bit off level, a slight offset isn't very noticeable and is correctable with the next tile. I started at the top staggered edge and worked left to right using my hands to ensure it was firmly up against the wall and overlapping the previous tile.Cutting around light switches and electrical outlets was not that hard. Before I peeled the waxy back off revealing the adhesive, I would line it up on the wall to check where the light switch/outlet was and using an exact-o knife I cut a small square out. I cut small each time because I figured it would be better to keep cutting a little more than cutting to much and my patience payed off. I did my best to just cut around the metal enclosure box that houses the outlet or switch. Once it laid flat against the wall, I peeled, sprayed, put it on the wall and put the outlet cover back up.That is pretty much it. I took a lot of breaks; found this at times to be a bit nerve racking. Working under my cabinets with poor lighting trying my best to be as accurate as possible. Rounding a corner was easier than I thought as well. Just keep pressing all the way up to the corner and then press it into the corner. Lastly I added my sealant to the top of the counter top, let it dry, cleaned up my mess, wiped my back splash down with a damp towel for a last minute check for bubbles. Took me over three hours from start to finish.
B**N
Good For Apartment Backsplash
Well, I have a 20-year career in the tile and stone industry— installed hundreds of square feet for family & friends— and my people would ridicule me endlessly if they knew I put up a peel-n-stick backsplash. But that’s just what I did. My apartment kitchen needed it; I got tired of staring at 7 coats of Antique White semi-gloss paint covered with heat duct dust, and I’m not permitted to install tile in my apt., despite my abilities. So I bought this stuff, for the relatively high price of $2.50 / sf.It was easy to install, although it took a bit longer than expected. Tools to have on-hand: a sharp razor, a good straight edge, a tape measure, pencil and a flat, solid cutting board. First thing to know, and it’s written all over the instructions, is start with a clean substrate. My wall was marred and shiny; I probably should’ve lightly sanded it, but I gave it a solid wash and rinse and the panels stick well. You learn as you go: best to peel back the release paper about 1/3 when lining up new pieces, for example. I finished the edges by masking and scoring a bead of gray silicone, which gives a nice look while also hiding rough cuts or out-of-level tile lines. Speaking of: any bumps or pits in your wall will show through this vinyl sheeting. Also, it off-gases an odor that I expect will dissipate quickly.Overall, it looks great (especially from a distance), even to my tile-trained eyes. Before and After pics attached.
S**N
Better than expected
The media could not be loaded. I have seen and sampled many peel and stick backsplashes before deciding to try this one. The price is fantastic for the quantity of tiles. The texture of them has a smooth rubbery feel, kind of hard to explain but is easily cleaned. It has an almost magnetic edge so the panels attach so perfectly with little effort. I had to cut a little excess off one of the tiles to line up with my cabinets. It was very simple to do and did not damage the tile at all. It’s been almost a month and they are still on, no peeling even with it being right next to the stove and a radiator. Great product!
D**N
Looks Great and easy to install
This was my first time using this style of product, and to be honest I was very unsure of what it would turn out to look like. But as it being my first time using this and a quick read through of the very straight forward instructions, I got the hold of it very quick. It's literally like putting a big sticker on the wall, I took my time made sure everything was cleaned up and dry then aligned the stickers one by one using the tabs and a chalk line. I could not be more impressed with the quality of this stuff it holds EXTREMELY tight, and everyone that came through that day assumed I used real tile. Looks Great and would recommend to anyone looking for a less expensive alternative to stone. Thanks Art3d
P**
Very adhesive and looks so good!
When I first purchased this product, I thought it would be white. When I unboxed it it was more of an off white/beige color. I actually like this color even better than the bright white look, especially with my cabinet color! Very satisfied and I’ve already recommended this to several friends!
A**R
NOT a true white
The color in the photos shows a true white when in reality these are more of an off white/ivory. I can’t use these at all because our cabinets are bright white and these would clash. Can’t return either because the short window of time was closed.
C**A
Easy to use
These were so easy to install in my kitchen. They cut nicely and have had no problem with them not sticking.
M**E
Brilliant effects
Adhesion brilliant easy to work with great value
J**N
Fabulous look!
Easy to use and changed our kitchen look in a great way. looks very expensive!
G**Y
Amazing for such a small detail
Put it on my RV. BRIGHTENS the whole thing. It feels solid, classic color but doesn’t look cheep. Easier then dealing with the full slabs and grouting, not sure if I’d use it in a full kitchen but looks great here
E**.
Five Stars
Easy to install compare to the traditionaI tile,love the way it look in my kitchen!
Trustpilot
2 days ago
1 month ago
