🔩 Tap into Efficiency with Every Connection!
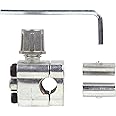
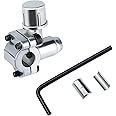
The SupcoBPV31 Type Universal Fitting Bullet Line Tap Valve is engineered for seamless integration with R12, R22, R134a, and R502 systems. Its compact design requires minimal clearance for installation, while the included hex key ensures a straightforward setup. With a corrosion-resistant finish, this valve promises durability and reliability in any environment.

| Brand | Supco |
| Item dimensions L x W x H | 1.5 x 2.5 x 3.5 inches |
| Exterior Finish | Silver |
| Inlet Connection Type | Threaded |
| Outlet Connection Type | Threaded |
| Number of Ports | 2 |
| Specification Met | Compliant with various industry standards and specifications |
| Global Trade Identification Number | 00687152010769, 05053197011811 |
| Manufacturer | Supco |
| UPC | 722651300932 733281627030 741812665420 717449096159 094700517555 741812665437 687152010769 674897878754 |
| Part Number | BPV31 |
| Item Weight | 3.2 ounces |
| Product Dimensions | 1.5 x 2.5 x 3.5 inches |
| Item model number | BPV31 |
| Is Discontinued By Manufacturer | No |
| Size | Single Unit |
| Color | Silver |
| Thickness | 1 Inches |
| Item Package Quantity | 1 |
| Included Components | Unit^Instruction Guide |
| Batteries Included? | No |
| Batteries Required? | No |
D**D
how to get more Freon into your fridge
Very affordable quality fitting to allow you to add Freon to a refrigerator which is low. This clamp on valve attaches to three different size copper tubes using the two inserts provided. The instructions inside explain the process. Very easy, even includes the allen wrench. My side by side Viking freezer/fridge has a top mounted compressor. There are no service valves, so this one is needed to measure the pressures and to add Freon. You mount to the suction, or low side on a straight portion of the copper pipe. That one is slightly larger than high pressure side. Also it will be cooler than the high side which should be warm to hot. Clean up the copper with a bit of emory cloth or steel wool. Wipe clean. Place the valve over the pipe with the port in a position convenient to attach the Freon can hose. Tighten down the three clamping screws. The center screw gets advanced a few turns to pierce the copper. The piercing needle also functions as the valve. After attaching the Freon hose, you back the screw out a turn to two max. You can then add Freon in bursts watching the gauge between bursts. In second picture you see a can of R134a ($4.88 from W*****t).Note, because these cans now have a built in Schrader type valve, I attached a $4 blue plastic can adapter to use with the hose.A word about the adapter; They are cheaply made and easily cross threaded when attaching. I watched all the videos, read the comments and still was confused! Allow me to explain. The bottom of the adapter has a brass threaded collar which screws onto the top of the can. The top has a blue plastic threaded nipple which screws into the Freon can tap - hose- gauge adapter (also purchased here on Amazon). There is a fixed needle in the bottom of the adapter which opens the Schrader valve in the can when screwed on, allowing Freon to flow. There is also a needle in the top of the adapter centered in the middle of the blue threaded nipple. I don't think that one does anything at all, certainly doesn't open the flow through the adapter (that was confusing me).I recommend screwing the brass Freon hose can tap onto the top of the blue adapter FIRST. I used a bit of teflon plumbing tape on the threads. Snug up the connection, but not too tight.Next, Turn the handle on the brass tank adapter all the way clockwise to close the valve. The pin on the tank adapter, which is designed to pierce the old style tank metal tops (no longer sold in the US) simply closes the valve. It doesn't do anything inside the blue adapter, and certainly doesn't touch or push the internal pin in the adapter.Now, carefully screw the blue adapter, already attached to the can tap- hose -valve assembly onto the Freon Can.After about two turns, the pin will depress the Schrader valve on the can and a small puff of Freon will be released.Keep turning about one to two more turns until the can is seated inside the adapter. No more Freon will leak out.You might want to wear a glove to hold the can, but honestly, only a tiny puff of Freon leaks out around the connection. You are now ready to go.Before attaching the hose to the BPV valve, open the valve on the can tap a crack to push a small blast of freon through the hose. This will blow out any air and moisture from the hose. Then quickly snug the hose onto the BPV valve.Now with the valve on the can adapter closed, the gauge will read '0'. Next open the valve on the BPV, by backing out the center screw with the allen wrench one full turn or a bit more. Watch the gauge. With the compressor running, if the Freon level in the fridge is low, you will see the needle go into the negative range. Mine went to about -10, indicating a very low level. Inside my Viking Fridge, the label indicated a full charge of 5.5 ounces of 134a. I was probably down around 2 ounces.Then open the valve on the can adapter a turn or so, watching the gauge. The pressure will shoot up to 40-60 indicating Freon is flowing. Leave the can adapter valve open for 10-20 seconds, then close and watch the gauge, which will go back down quickly, showing the pressure in the fridge suction. With each successive blast of freon, the pressure should increase in the fridge. Note: as the Freon leaves the can, the can will get cold and may sweat. As a result, the pressure on the gauge with each successive blast of Freon will go down. This is totally normal.Continue the process of blasts of Freon until the gauge goes to about +2 pounds. At this point you should be close to full. DO NOT OVERFILL THE FRIDGE. Too much Freon will put a strain on the compressor.Once you have added sufficient Freon, close the valve on the can adapter, then close the valve on the BPV by tightening the center screw with the allen wrench. You may then remove the hose from the BPV and place the cap on the BPV securely.Note: during filling, keep the Freon can upright so only gas is pulled into the fridge, the liquid in the can stay s on the bottom. DO NOT allow the can to flop over on it's side.I then disconnected the Freon can by unscrewing it from the blue adapter. Again, short puff of Freon comes out as you disconnect, but really a tiny amount. The built in Schrader valve in the can top will seal it, so the remaining Freon stays in the can.So, Refrigerators and Freezers and AC's should not use up or loose Freon. There must be a slow leak in the condenser, evaporator or one of the connections. I will monitor to see how long it takes for my Freon level to drop and assuming that it is very slow, will consider one of the leak stop products when I have to top up again.
A**R
Exactly what I ordered
I've used this type of component for years and the quality of this one was the same as the ones I used 45 years ago. I would recommend this product.
J**
Fast shipping
Worked great
H**R
Works perfectly
Did what it was supposed to.
E**N
Recommended
Worked as intended!
Trustpilot
4 days ago
2 weeks ago