🚪 Open Up to the Future of Garage Access!
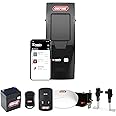
The Genie B6172H Wall Mount Smart Garage Door Opener combines cutting-edge technology with powerful performance, allowing you to effortlessly control your garage door from your smartphone. With a compact design, it lifts heavy doors up to 14ft high and 850lbs, ensuring safety and convenience for modern homeowners.


| Manufacturer | Genie |
| Part Number | 41410V |
| Item Weight | 31.2 pounds |
| Product Dimensions | 21.3 x 6.86 x 14.55 inches |
| Country of Origin | Mexico |
| Item model number | B6172H |
| Batteries | 1 12V batteries required. (included) |
| Size | DC Motor lifts up to 14ft high doors & 850lbs |
| Color | Black |
| Style | Wall Mount - BBU & WiFi |
| Pattern | Opener |
| Item Package Quantity | 1 |
| Type of Bulb | Bluetooth LED |
| Coverage | 18ft wide, 14ft high, 850lbs weight, vertical lift doors, standard doors, and high lift doors up to 84" of high lift |
| Certification | UL 325 Compliant |
| Included Components | INCLUDES: (1) 3 Button Pre-programmed Remote, Battery Backup, Wireless Wall Console, Wireless LED Light, Aladdin Connect Wi-Fi Smart Technology, Automatic Door Lock |
| Batteries Included? | Yes |
| Batteries Required? | Yes |
| Battery Cell Type | Lithium Manganese Dioxide |
| Warranty Description | Limited 15 Year Motor Warranty, Limited 5 Year Parts Warranty |
P**A
Compatible with EZ-set Clopay; How to eliminate humming noise when standing by
I have a two-car garage with a Wayne Dalton steel sectional door. I replaced the broken Wayne Dalton center wall mount opener and torsion tube with the EZ-set torsion kit by Clopay.I ordered a belt-driven opener but had to return it because I have an earthquake-reinforced beam across the garage that blocks the installation of the belt support. I used to have a chain-driven opener but that's only for a swing door, tough enough to be donated for building homes.The good thing about the Genie is that if you mount it on the same level as the EZ-set, it will work. For me, it's screwing a 2 by 4 next to the old one where the track was mounted. Also, if your tube is dead-centered, the end may not be long enough for the Genie. I needed to unwind the spring and shift the tube a little to give it a longer end for the opener.If your torsion tube is mounted correctly without wobbling, all you need to do is mount the coupler and tighten it correctly to both the torsion tube and the opener. In doing so the opener is automatically in the correct position. All you need to do is to secure the mounting bracket without forcing the opener off its position.I appreciate the modular packaging. The screws are packed and sealed with the parts they are for.The bad thing is that the installation sheet asks you to install everything before you know if it works. You have to install the battery, the lock, and the safety sensor. I prefer to install just the motor and then be able to test it. Then I know if I need to return it without so many commitments. And then I can install and test the lock and sensor one by one. For me, both need custom drilling on the metal rail or concrete. The sensor wires have to go all the way up, down, and across the garage door. The other thing about the installation sheet is that it's too big. I don't have the footprint for it in the garage.Targeting DIYers, I suggest giving each sensor (the transmitter and receiver) one connector to plug into the main unit. And since the wires have to be cut to length, the connectors can be like Wago lever nuts. Or the wires are stiff enough to insert into the connectors directly. I'm paying half a grand for the opener whereas the belt versions are less than half.The really bad thing happened when the emergency release cable jammed! I understand it has to be fail-safe when released. So it's understandable that it's not unsafe when the motor cannot be engaged again. To be specific, if you pull the release cable, the motor will be disengaged with the torsion tube and the garage door can be operated by hand. If you pull again the spring will pull the cable back up so the motor gets engaged again. At the critical moment, I could not engage the motor again. So I had to uninstall the opener, open up the metal case, and unjam the release mechanism. Luckily it worked.But the unmount wasn't without problems. The tube at the opener is oval due to too much tightening. Well, high up in the ladder I wasn't sure when the screw made contact with the tube. The screws are tight anyway. And I didn't count how many turns I added after contact. I had a wrench with a 4-inch handle. I just did my best not thinking I could tighten too much. The coupler could be taken off with some difficulty. But the side of the opener could not be taken off totally when I tried to unjam the release cable.So I suggest you may want to test the release cable once when you unpack it. You never need to pull and release it again to keep the opener in the engaged state. You can mount the opener while the door is half open. I don't think you even need that. You should be able to do the adjustments with the door initial closed or in any other position.To adjust the fully closed and fully open position of the door, the opener uses two LED's and 3 buttons. Why? I remember the good old days when I had to count how a tiny LED blinked to give me the error code for the dishwasher. I swore I would never get another appliance without at least a numeric display. The settings could have been set via a smartphone. In addition to the two settings, you may also have to set the drum size and the force level. It may cost more but I'm paying more than double than a belt one.The wall control, remote control, and the Bluetooth light are all factory-connected. I picked the Genie because it works for HomeLink, Google, and Alexa. I have a car that has HomeLink. My wife will prefer the remote while I'm an Android user.It turns out that the most challenging step was installing the battery. The savings without it is minimal. I have to hold up the heavy battery with one hand, align the screw hole, the cover, and the battery, then put in the screw. There was no space to hold the screw by hand, no way to hold the screw with a flat screw driver. You can put the screw in but it won't engage the threads. My dear screw fell off into the dirtiest corner of the garage, twice.It happened that I saw a long wrench socket. It was perfect to hold the screw in position and gave it a few good turns by hand. The alignment and the rest were easy.I did hear the humming noise when I finished the installation. It's there all the time when the motor isn't operating. It didn't bother me at first because nobody could hear it outside the garage. However, my son whose bedroom is right above the garage reported that at dead of night, he can hear it. Hello Chamberlain!I can feel that the opener case is vibrating when nothing is happening. So it must be the transformer which has a changing electromagnetic field constantly that is capable of motion if it is not of a high quality. Mounting the case in a better may work but unfortunately, there is only one mounting screw on the side of the case. On close inspection, the transformer is secured in place at the bottom of the opener by two screws, which you can see without the battery or bottom cover. All you have to do is loosen both so the vibrations don't couple to the case. Just remember to disconnect the power supply and the battery before you do anything not on the installation sheet.Regarding the drum size, the EZ-set has a 3+ inches drum while for the Genie, a standard drum is some 4+ inches. As one other reviewer stated, the opening time for the EZ-set drum is 21 seconds. If you use the standard-sized drums, the speed should be about 14 seconds. I installed both myself for the first time so I'm not going to repeat all the installation again saving 7 seconds. I am too happy they all worked out.I don't need to waste 7 seconds of my life waiting for the garage door every time. I can use a voice command when I'm on the way to the garage from the bedfast table. The same when I'm almost home. Any remote control will also do. I can also get smart speakers instead of installing everything again.
S**R
Excellent product, excellent documentation.
I bought this opener to control a large (12ft wide, 10ft tall) and heavy door for my workshop. We have another building that has a traditional Chamberlain opener installed so I briefly considered that brand, but after reading the reviews and the product documentation, I'm glad I didn't. This Genie product seems clearly superior.Unlike the Chamberlain product where the installation manual requires the installation of a phone app and there is no printed manual (no thanks), the Genie installation manual is a large (22" by 34") fold-out document that is clearly illustrated and very well-written. It was a pleasure to use, but I did have two minor issues with it:1) I had no experience with "cable keepers" and didn't understand their purpose, and the manual doesn't really explain them (they are spring-loaded levers installed at the bottom of the door that keep the cables from going slack and getting in the way when the door is being lowered). I noticed these performing their task later on when setting the upper door travel limit, which I'll explain later.2) Step 4 of section 7 (the installation of the "Safe-T-Beams", the light sensors on either side of the door that detect any obstructions while the door is lowering) says to remove 1/4" of insulation from the wires where they connect to the opener, then twist the two "like" wires from each sensor together for insertion into the terminal block. This should really be 1/2", not 1/4". The insulation remaining on the two wires makes them too large to fit into the receiving hole, and 1/4" of wire length does not protrude into the hole far enough for the "gripper" teeth to grab them. Discovering this on a 8ft ladder while simultaneously pressing a screwdriver to release the gripper teeth and trying to insert wires upside down into a poorly illuminated receptacle that won't grip the wires is rather annoying. I had to trim more insulation off the wires before they would insert correctly.Once installed, you switch from the installation manual to the owner's manual to program the opener. This 36-page document is also very well written and illustrated, but I did have one problem with it while setting the "down" and "up" limits for door travel. When following the first "Programming The Down Limit" procedure, the last step (after establishing the limit and "remembering" the setting) says that two LED lights will flash blue, then go out. While this is true, once the procedure is complete you immediately get two red LEDs that (to me) indicate cause for alarm. I didn't know what to do, so I went to the troubleshooting section where this LED combination says "Limits NOT set properly". I had to assume (and I was correct) that this simply means I had not yet set the "up" limit. I proceeded to that section, and after setting the "up" limit the red LEDs were no longer lit. Whew! The manual really should make this clear.Another thing to be aware of with this type of door opener is that there are no belts, chains, or brackets directly connected to the door that effectively "pull it up" or "push it down". The opener pulls the door up by rotating the torsion bar shaft so the cables connected to the bottom of the door pull it up. That's easily understood, but when lowering the door, there's nothing "pushing" it down. The opener simply rotates the other direction, releasing tension on the cables so that the door comes down via its own weight in a sort of "controlled free-fall". Be aware that if you set the upper travel limit too high so that the vast majority of the raised door's weight is resting on the horizontal door rails that protrude into your garage, the door isn't going to start coming of its own accord down very quickly. This is exacerbated if your horizontal rails are mostly level, or worse, sloping downward away from the opening. I had the problem of the door lowering *very* slowly during the initial phase of a "close" operation, to the point where the cables went fairly slack (cue those "cable keepers" I mentioned above), then as the door started gaining momentum it SLAMMED downward forcing the cables taut, sometimes causing the opener to reverse direction. I fixed this by: 1) Raising the inward end of my door rails one inch above "level", so the door would have more of a tendency to "roll downhill" of its own accord; and 2) resetting the upper travel limit so the door was about one foot shy of its full upper position. Now the door comes down very smoothly and with virtually no initial slack in the cables.Even with the minor documentation nits, I give this product a full five stars, and I'm very satisfied. It's VERY smooth and quiet as a mouse. It has no trouble at all raising this big heavy door, and it's SO much nicer than those old-style units with the long rails, belts or chains and woefully inadequate brackets that warp your door panels.
Trustpilot
1 week ago
1 week ago