


🛠️ Elevate your ride, gear up like a pro!
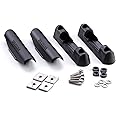
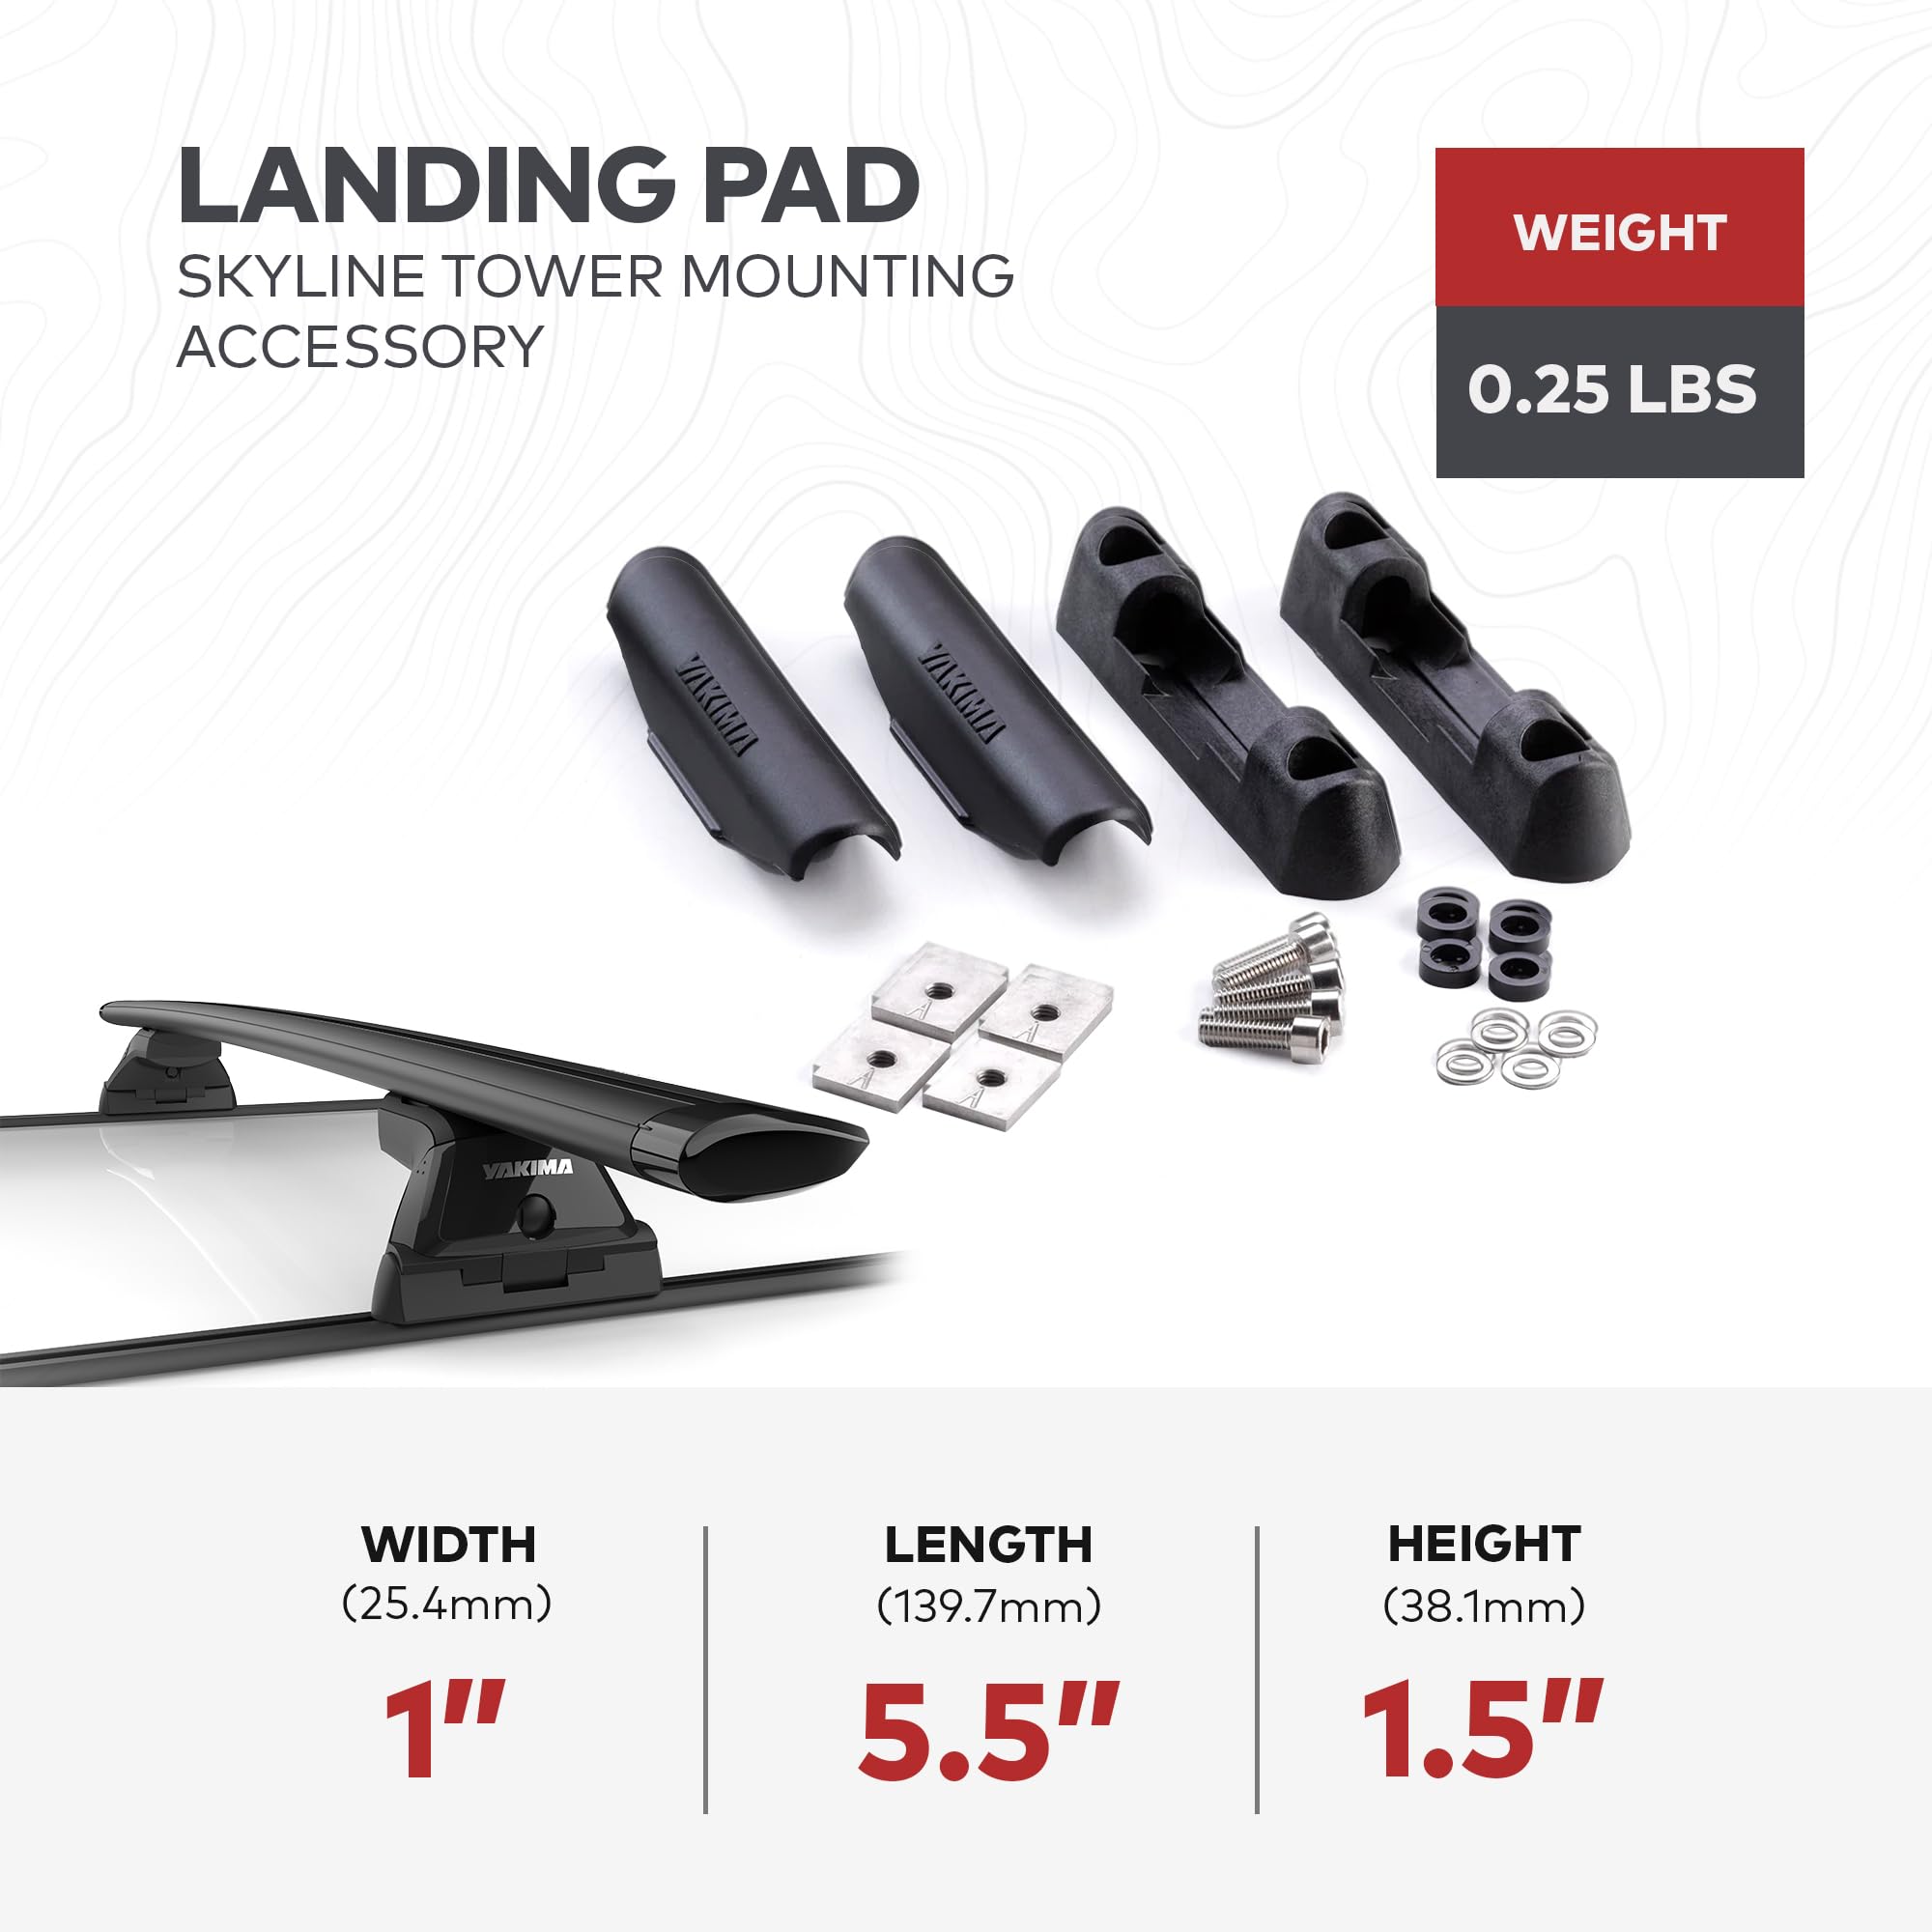
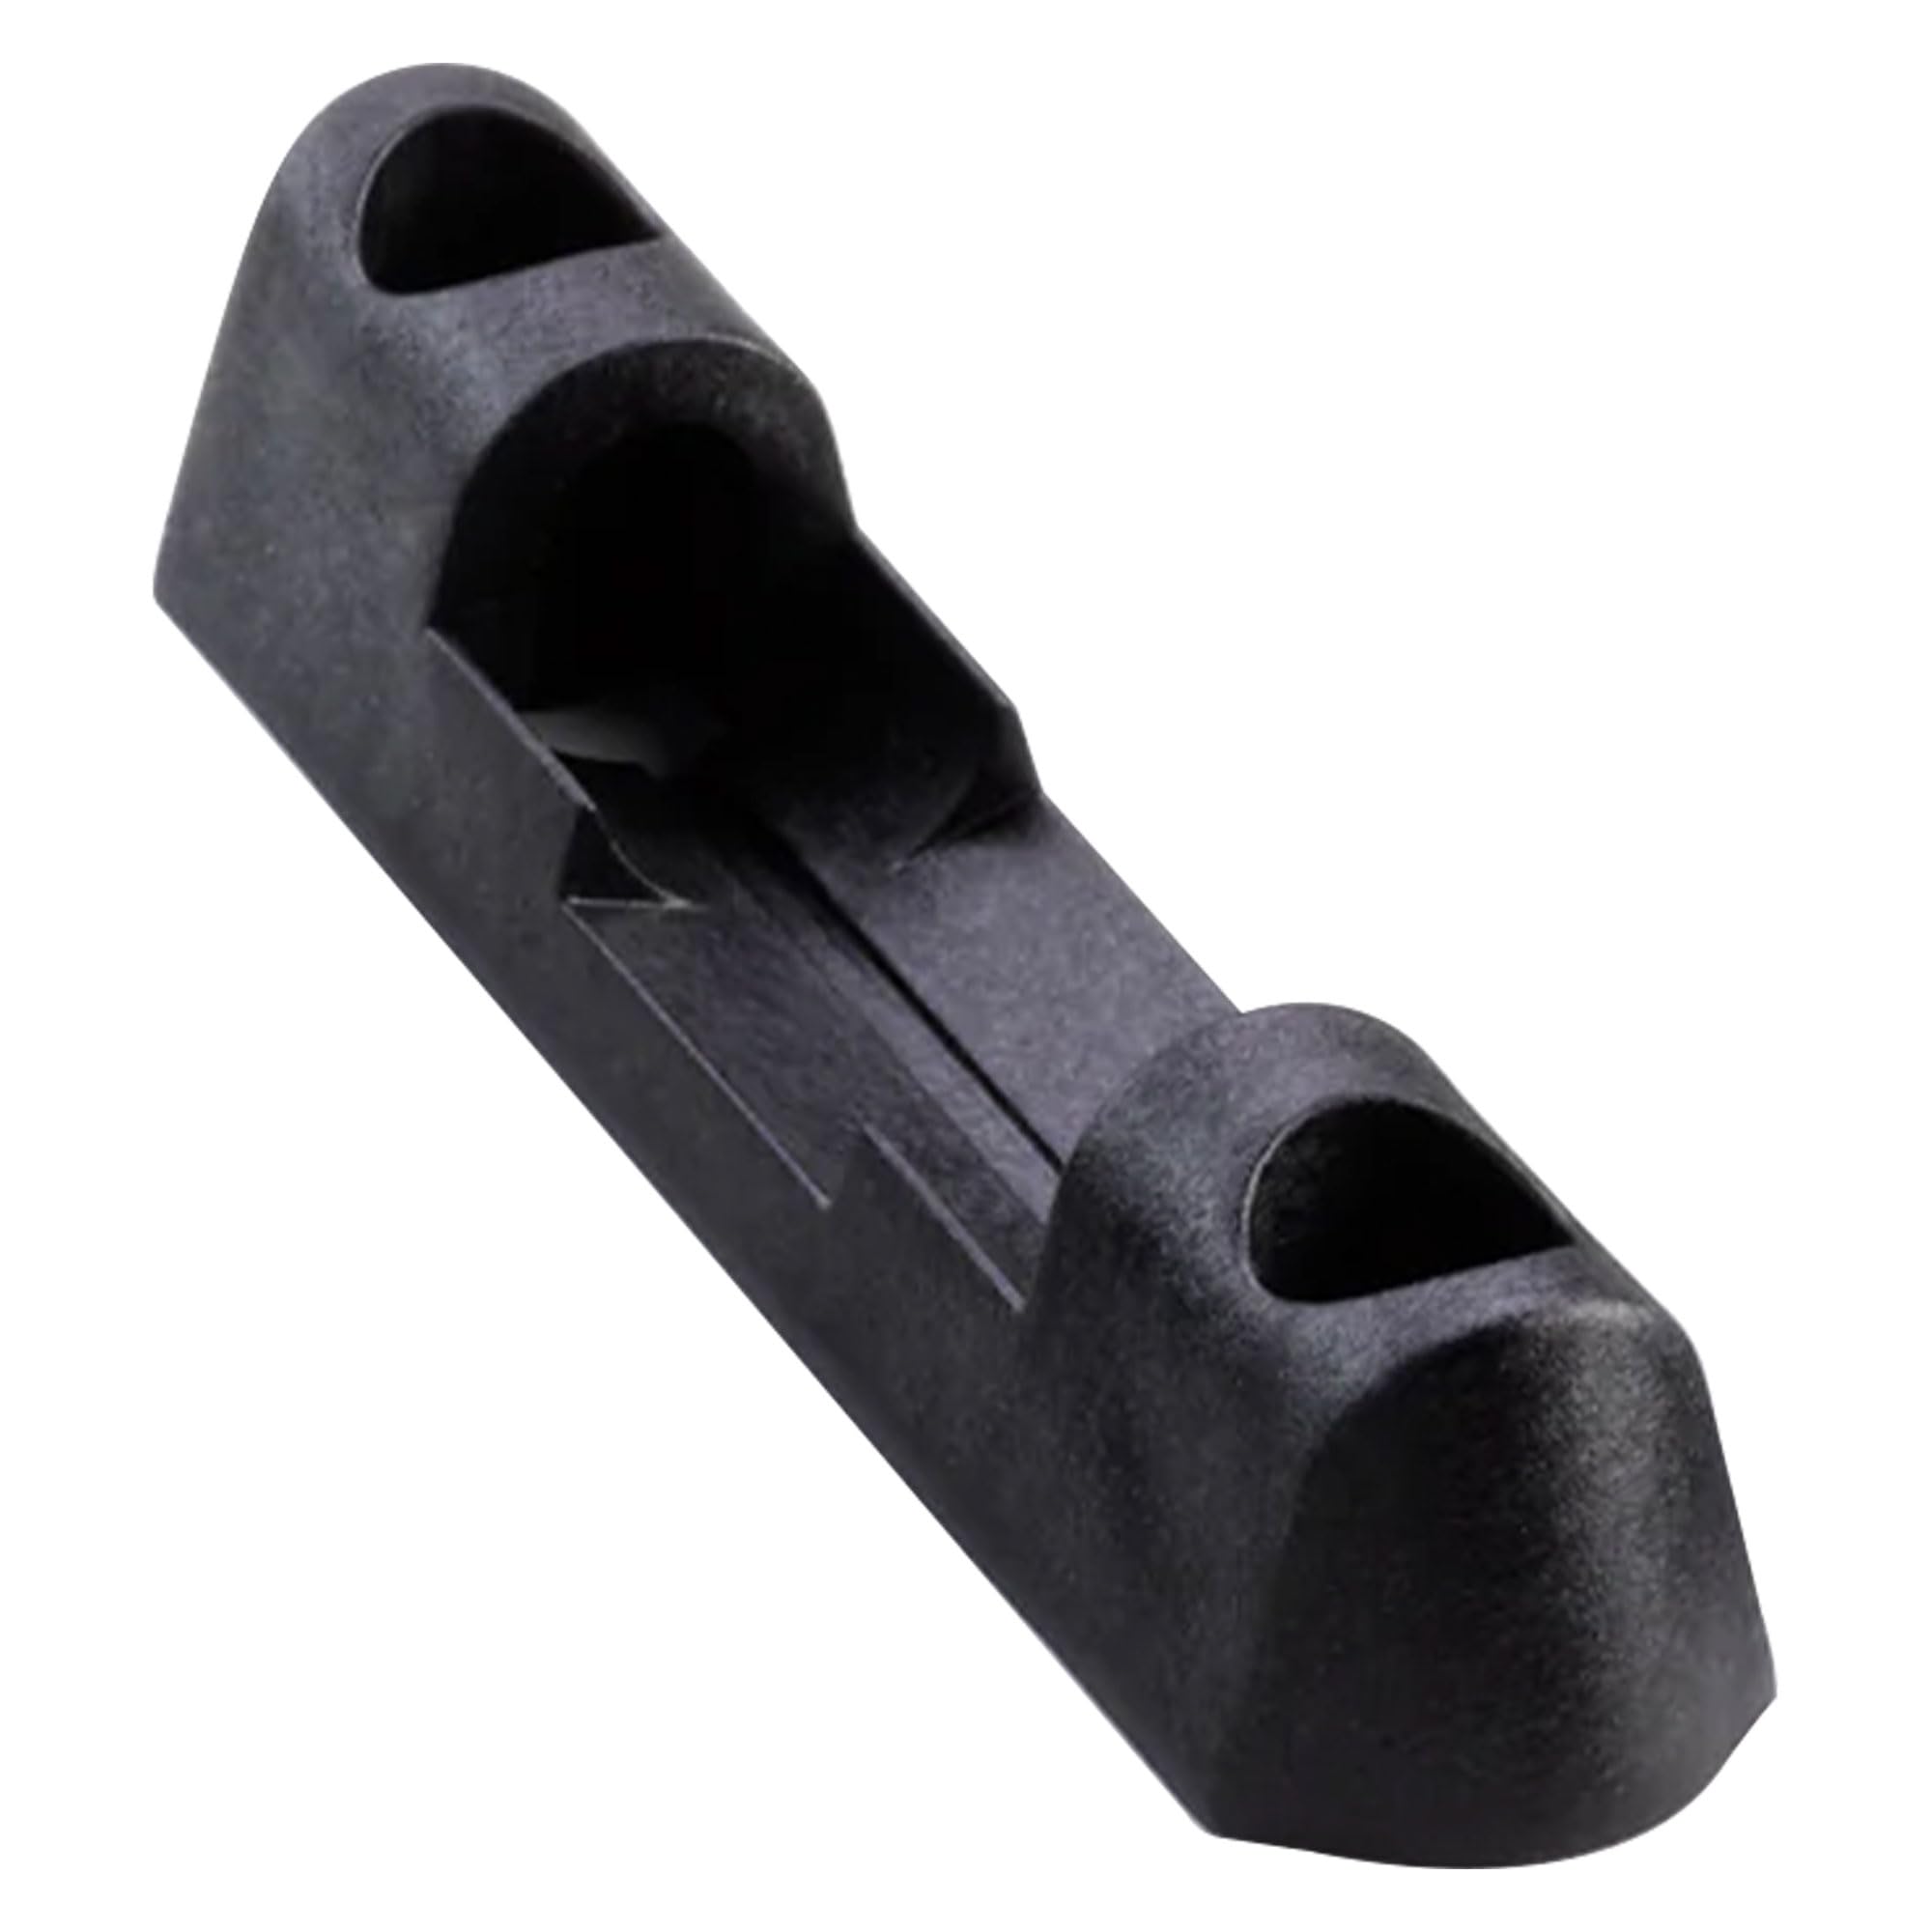
The Yakima Landing Pad 1 is a custom-designed set of two roof rack pads tailored for 1997-2004 Infiniti QX4 and Nissan Pathfinder models. It enhances load capacity by optimizing crossbar spread, integrates seamlessly with Yakima’s SkyLine and Control Towers for easy gear mounting, and includes protective snap-on covers for year-round durability. Lightweight and backed by a lifetime warranty, it’s the ultimate upgrade for serious outdoor enthusiasts.


| Item Package Dimensions L x W x H | 6.8 x 3.5 x 2 inches |
| Package Weight | 0.55 Pounds |
| Item Weight | 0.25 Pounds |
| Brand Name | Yakima |
| Warranty Description | Lifetime Warranty |
| Color | One Color |
| Suggested Users | mens |
| Number of Items | 1 |
| Manufacturer | Yakima |
| Part Number | 8000221 |
| Style | Landing Pad 1 |
| Size | Set of 2 |
| Sport Type | Kayaking |
M**E
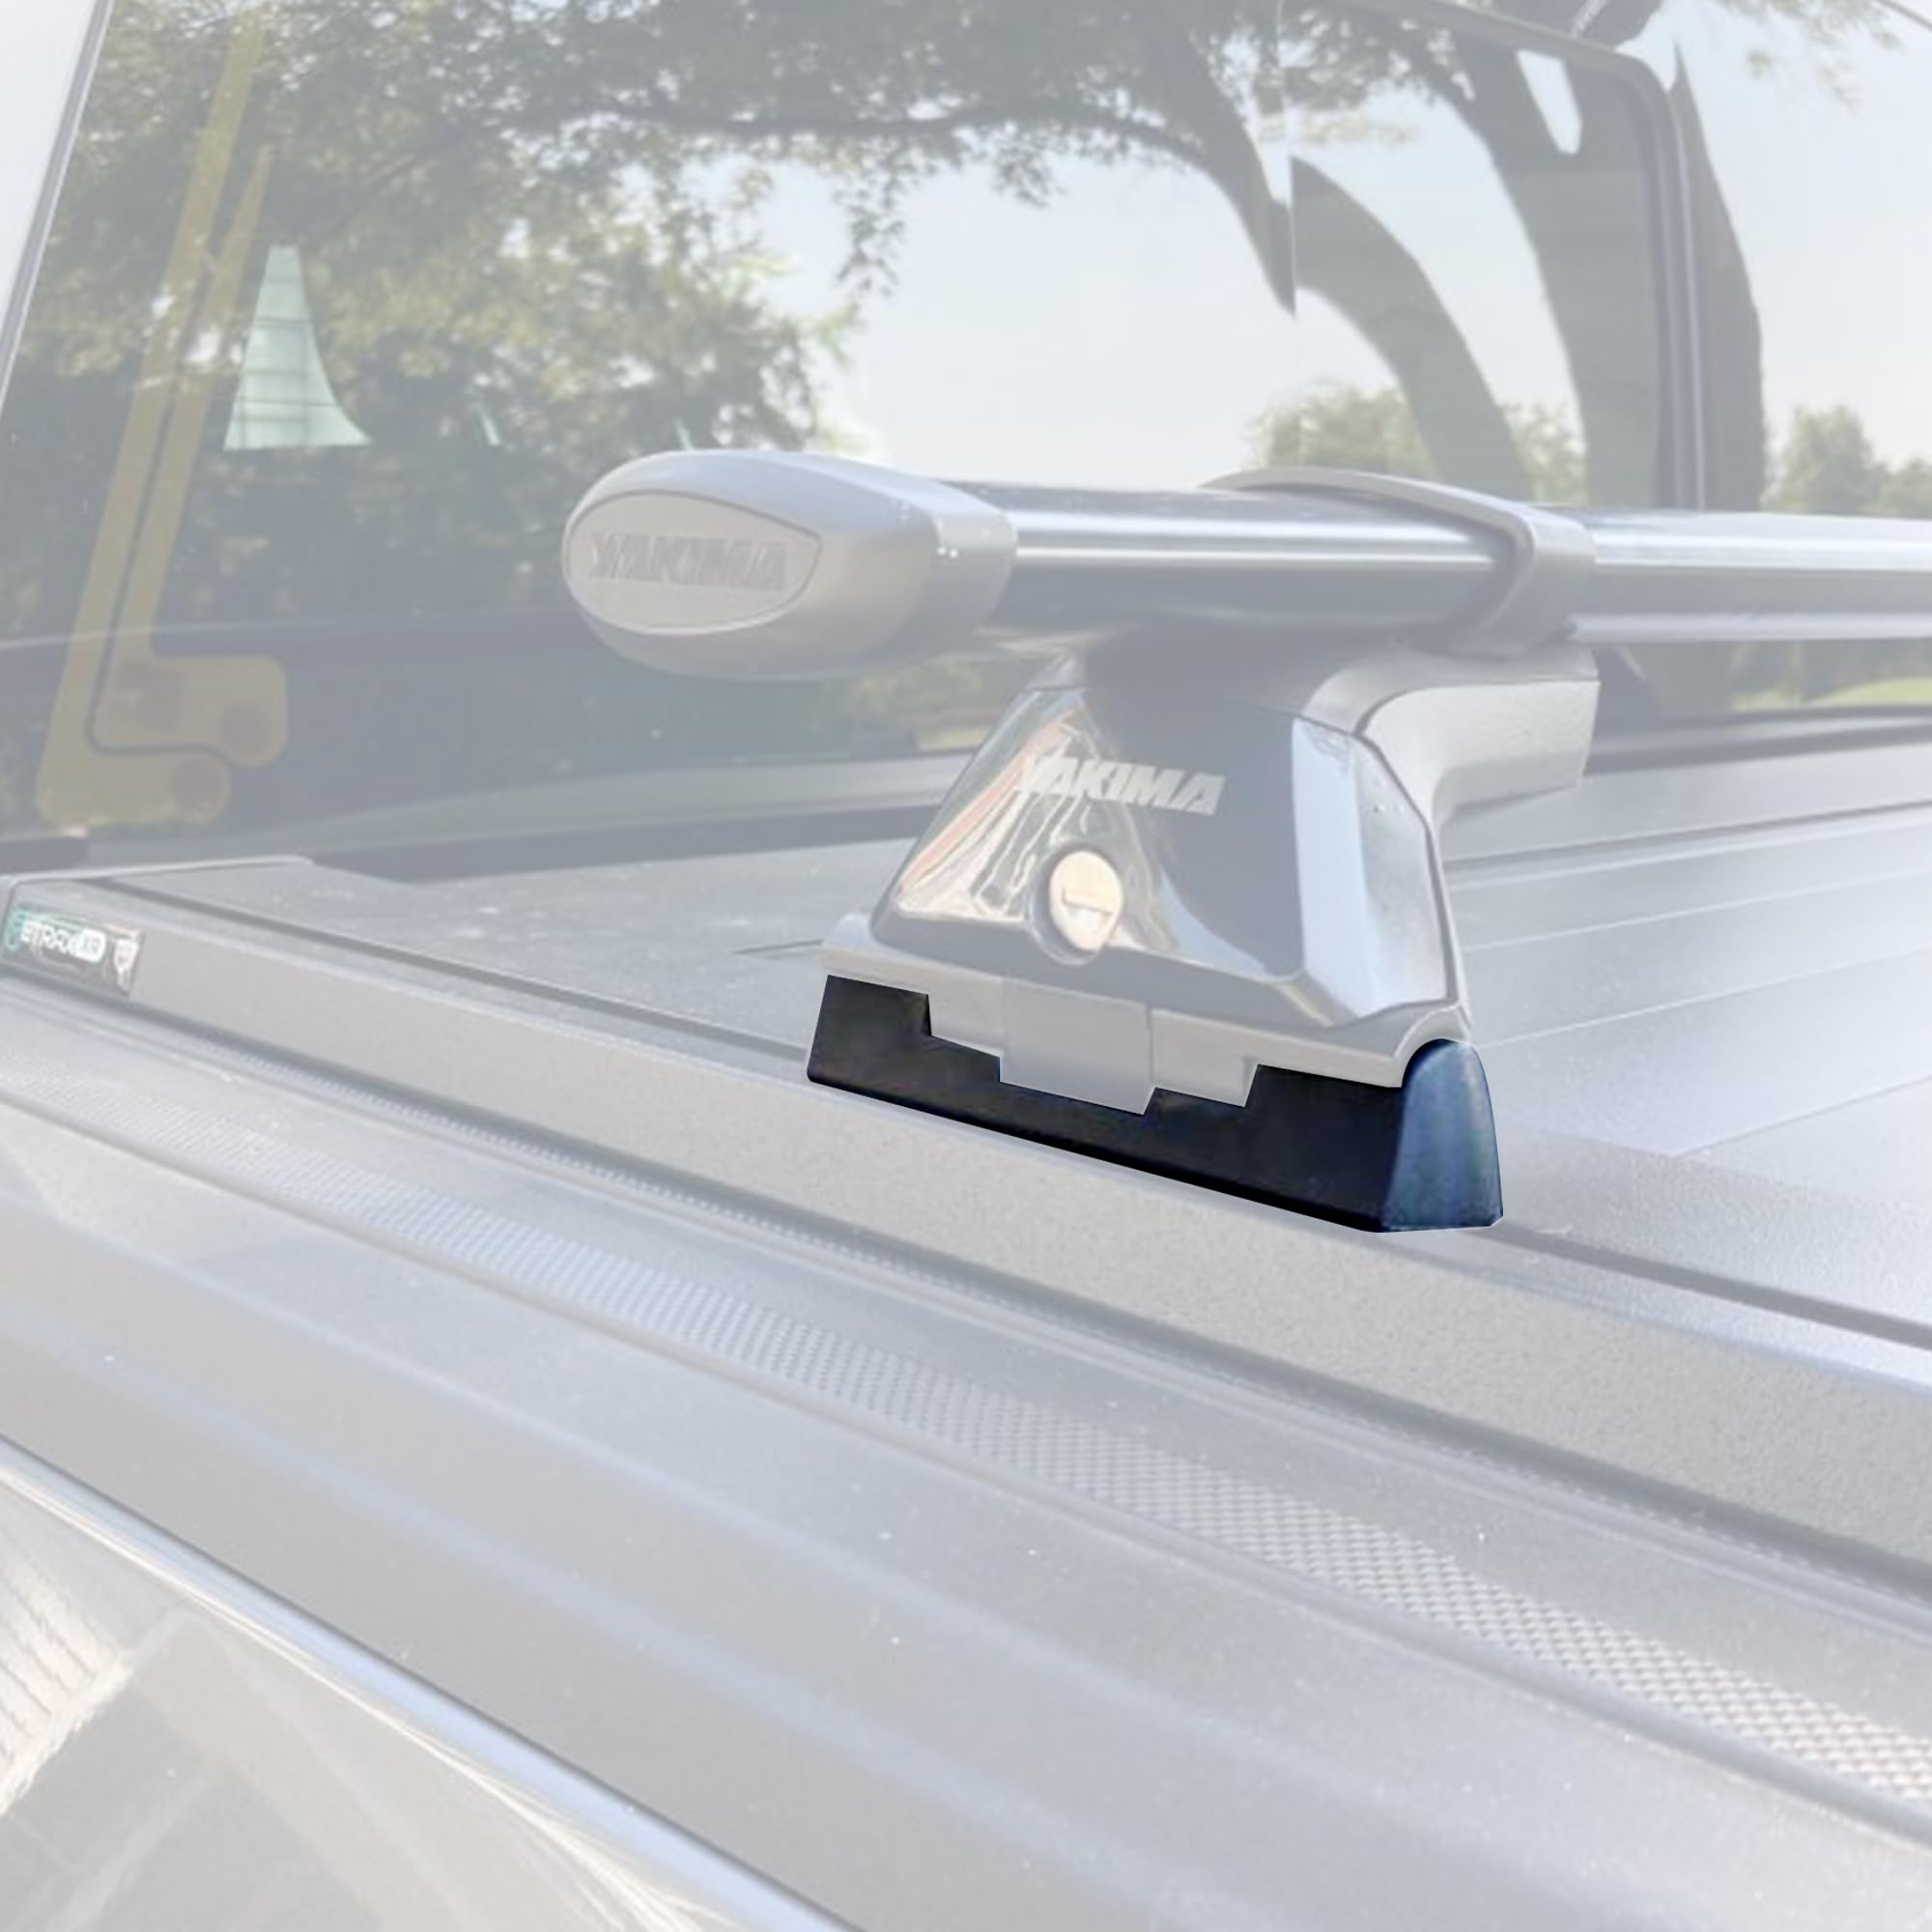
TACOMA INSTALL READ!
Toyota Tacoma ApplicationYakima Landing Pad 24Yakima Base Line Adjustable TowersYakima Jet Stream BarsFirst let me say these are great and work perfect. After successfully installing I drove with two kayaks well over 800 miles to the Florida Keys and back, on the interstate at 80+ mph. There was some noticeable wind noise from the front bar when not loaded, but it was not bad.When doing the install I read the Landing Pad instructions though I also watched a few videos (The Rack Shop out of Austin on youtube was prob the best) for installing the Landing Pads that helped as well. Take note that there are two places/holes on the truck cab at the font and back of the cab for mounting points to attach the rear Landing Pads. The instructions tell you to which hole that should be used for proper mounting. The two holes can be found easy and per the instructions say to make a small hole in the tape/sealant to expose the mount hole you are going to use. You then use the sealant that is provided to seal around the screw/mounting hole. Here is where I would highly recommend that you also seal the other hole as well. I never punctured the tape/factory sealant for the hole that was not to be used and did not apply any sealant to that area. The instructions nor any video that I watched suggested that you should or it need be done. After several rains I noticed there was a musky odor in the cab of the truck and then found that the carpet on the drivers side under the drivers floor mat was wet. I took the truck to the dealership thinking it was a recently replaced windscreen issue. They had the truck for 2 days and were not able to recreate the leak and they suggested that it was the roof rack mounts. Once I got the truck home I was able to recreate the leak by putting a water hose on the rear Landing Pad on the drivers side. Upon removing the Landing Pad and inspecting I found that the tape/ factory seal over the unused hole was compromised and was likely the case of the water getting into the cab. I applied liberal amounts of sealant to the area as well as the checking the other Landing Pad mount as well and putting sealant on them as well. I have since been through several car washes as well as several good down pours of rain and the interior of the truck cab has stayed dry. In closing Yakima makes a great product and I can not recommend them enough. But just use caution and be sure to have extra sealant when you do you install to cover those unused holes (even though they are already covered). I hope this prevents others from getting leaks into there vehicles. It was rather trying to get the carpet and padding to dry out.
E**D
Great kit!
Used these Landing Pad 6's on my 2000 TJ Wrangler's Hardtop as a permanent mounting option for the new Skyline Towers and 50" Corebars. The install was a little tricky at first but only because you wanna have your stuff lined up correctly before drilling 8 holes through your roof!Double or triple check your measurements! and I did draw an outline with pencil right on my roof around the Landing Pad after checking my measurements so it would be easier to line them back up after drilling. I found the kit to be easy to install once you have the measurements marked and your outline drawn , then you can mark your holes, pilot them with 1/8" bit, then open them with the 1/4". The rest just falls into place perfectly and is a smooth install the rest of the way.Good luck to all! Highly recommended!
R**L
It’s exactly what I was looking for
Easy to install. Took less than 10 minutes. Fit perfectly.
L**S
Great product, but install is not for the faint of heart
I bought this for my Prius based on the excellent write-up on how to install it on the Prius found at [...], thank you Darrell.First, the positives. It is SO EASY to mount and unmount the crossbars and control towers with this system. It literally takes 30 seconds total. There is an up-front investment of time and careful measuring and drilling, but I plan to have my car a long time, so its worth it. And if feels very sturdy, there's no movement whatsoever. And since my wife also has a Prius (nerds!) I'm going to install the landing pads on her car too. The landing pads have a pretty low profile, but you will notice them on the roof.Now, the reasons I didn't give it 5 stars. First, as my title says, the install is not the easiest, although I think the biggest obstacle is just convincing yourself to drill holes in a perfectly good roof. I have to say that I wouldn't have been as confident about the exact spots I wanted to place the landing pads, if it wasn't for guidance from that website.The guide that comes with this product is not the best. First, they really offer no advice on where to place the pads, but I put them 1/8" from the rain gutter, as I think the 90 degree angle the sheet metal makes at that point adds to the strength of the roof support. The other major issue I had was that, as the other review suggested, you want to be pretty exact with the size of the holes. The reason for this is that if a hole is too big, the piece that enters and holds the pad to the roof will spin in the hole as you try to tighten the bolt. I just thought something was defective until I realized this, so I just bent the piece a bit to force it to catch the surrounding metal. The guide says to drill a hole 25/64 inches wide. WTF? I've never seen a drill bit that size. So after making the pilot hole, I just used a step bit to 3/8" , then used a regular bit to shave a little off the insides.The other issue I have with this product is with the covers that go on the pads when not being used. They just don't seem to make a tight fit, and it seems like they might even be pulled off at highway speeds, since the only thing holding them on is friction between two pieces of plastic. I will update if one actually falls off.One thing I really like is that I won't be tempted to keep driving with the rack on my roof after using it, which is good for gas mileage, and I don't have to worry about theft. Good luck
Trustpilot
2 months ago
2 weeks ago