


🔧 Repair, Refresh, Rejoice!
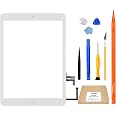
The JPUNG for iPad Air 1st Generation Screen Replacement Touch Glass Digitizer is a high-quality, durable solution for restoring your device's screen. Compatible with all versions of the iPad Air 1st Gen, it features a scratch-resistant surface and includes a complete repair kit with a video guide, making it easy for anyone to achieve a professional-level repair.
P**.
Cheap fix
This is not my first time repairing an iPad, so the lack of instruction was no problem for me, it is very easy to install, and the hardest part of any ipad screen repair will always be the removal of the old screen (especially if it is shattered, if shattered be sure to install a sticky screen protector to the shattered screen and heat it very well to insure adhesion).Be sure to use lots of isopropyl alcohol to clean the inner border of the frame where the adhesive mates the screen to the frame, or your new screen will not stick or lay flat.There are four screws that hold the LCD display in place (one in each corner, two under factory tape) once unfastened, lift the LCD and remove the three screws that hold down the plate attached to the plug connecting the LCD to the board. Beneath this there are the three additional ribbon cables which need to be removed (two for the digitizer that clip in and one for the home button wich needs to have a lever flipped up to be removed).Next do your cleaning of the frame.Apply new adhesive to the frame.Plug the ribbon cables back in where the old ones were removed, be sure the home button ribbon is pushed in as far as the previous one and that the white line is parallel to the clip that holds it in place, be sure the other two ribbons make a tactile "click" when going into place.Ensure you removed the protective tape from the edge of the new ribbon cable where the digitizer cables come out, as well as the blue border tape and the interior screen protector.Next, reinstall the LCD screen, first the three tiny screws to hold the cable in place, then the four corner screws. This is followed by installation of the glass itself.Start by using the plastic flat blade to ensure the edge of the digitizer ribbon seats into the groove in the frame and then slowly and deliberately push the screen back tight to that side of the frame, seating it tightly and working your way around the edges until the entire glass sits flush in its chamfer. If you mess this up, gently work the plastic blade under to lift the glass and work it into place again.Once the glass is properly positioned and sitting flat in place, turn on the iPad and be sure everything is in working order.If everything works well, use your heat gun (A hair dryer on its highest-rated heat setting can work, it just takes longer) to get the edge of the screen and the frame up to a high enough temperature that the adhesive will start to melt, now using a cotton glove or a piece of paper towel press firmly and rub along the edges where the adhesive was applied to ensure it makes a solid bond.Congratulations, instead of throwing something away, you fixed it.
S**
Don’t take the tape off first!
The screen is fine and fits my old IPad Air good but the instructional video is not great! It’s obvious that they have taken their screen off first with the ease that they slide an piece of cardboard down the side of the screen. I ended up using the orange tool that comes in the package and even then I ended up shattering the screen, I popped on a pair of safety google just incase.Don’t take the sticky tape covering off the main 4 sides until your practically ready to stick down the screen, or you will end up catching everything on it and it dulls the stickiness.Also, there was not sticky tape on certain sections of the wire that they show on their video and no inside screen protector as they also show on the video.Apart from that, for the price and if you’re confident about having a go yourself at screen replacement this is a good product.
E**U
Buon rapporto qualità-prezzo
Montato facilmente. Fare attenzione al supporto della fotocamera frontale che è leggermente storto; non premere troppo in fase di montaggio e non combacia perfettamente con la fotocamera. Tasto Home più rumoroso dell'originale (il classico click lo si sente).
K**.
100% does the job - this is my go to for screen replacements.
Does what it needs to do.for a screen and digitizer replacement, its bang on.Comes with extra adhesive just on the off chance that the pre-installed stuff isn't there (I've had 4 of these so far, because kids find it hilarious when they smash the screen)Comes with all the tools you need to get the job done, the only thing that isn't included is heat which is 100% needed( i use a hair dryer to loosen the original adhesive)Its easy to install, just takes a little bit of time, don't kink the ribbons, unless you want ghost fingers, or unworking home button.usually takes me about 40 minutes to replace.Sellers top-notch with replies if you need further support for the product.If you are replacing for the first time, time and patience are key.make sure the edges are heated on the old screen, i always start with the top right corner, as there's no ribbons in the way.
D**O
Buena compra
Se me rompió el antiguo cristal de mi iPad y con este nuevo lo he recuperado de vuelta. Al tacto se siente algo diferente que el original, quizá el material no es el más premium, pero cumple su función. El botón de Home también se siente algo diferente y el sonido al hacer clic es un poco más seco que el original. Es cuestión de acostumbrarse.
Trustpilot
3 weeks ago
2 days ago

![KUBOM Replacement Battery for iPad Air or iPad 5th 6th 7th, Full 8827mAh 0 Cycle Battery - Include Complete Repair Tool Kits [A1474,A1475,A1476,A1822,A1823,A1893,A1954 A2197 A2198 A2200]](https://images-na.ssl-images-amazon.com/images/I/51Ikiem5FfL._AC_UL116_SR116,116_.jpg)