⚙️ Upgrade your Mirage Drive—stronger, smarter, and built to conquer the waves!
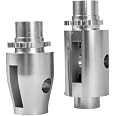
The MD180 Combo Front and Back Sprockets are robust stainless steel replacements designed specifically for all Hobie Mirage Drive 180 models. Saltwater resistant and engineered for durability, these sprockets extend the life of your drive system while saving you from costly full-spine replacements.
| Brand | Generic |
| Item Weight | 300 Grams |
| Material | Stainless Steel |
| Color | Silver |
| Style | Combo Front and Back |
| Seating Capacity | 1 |
| Model Name | MD180 Front and Back Sprocket. |
| Manufacturer | Fever |
| Brand Name | Generic |
| Suggested Users | unisex-adult |
| Included Components | Front and Back Stainless Sprockets |
K**G
Quality
This is the real deal! I have an MD180 mirage drive with a broken forward sprocket. Hobie wants me to spent $400 for a whole spline. I ordered these with lots of skepticism. I can tell you, this is the real deal. It is solidly made with stainless steel. These will out last me. Takes about 2 hours from start to finish. If you owned an MD180 drive, sooner or later your sprockets will break. Skip Hobie and buy these and you will never have worry about your sprockets being broken again.
H**M
Quality work, but a LOT of installation time
The part actually arrived more quickly than Amazon predicted which was nice. Very well packaged. So far I've installed the parts and done a "dry test" but haven't field tested it yet.The build quality seems very high -- solid stainless steel and well finished -- this will add some weight to your drive! Not sure why they didn't opt for to be a bit less expensive and lighter -- I suspect either metal will outlive the rest of the drive.The dimensions aren't dead on the original parts (for example, one piece was .1mm longer) so they are a very tight fit. I don't have a way to measure the sprocket but it seems like it might be a tiny bit off the original as well (the stock Hobie chain doesn't seem perfectly aligned with sprocket at the end-of-travel). None of that has caused a problem so far (dry test), but it makes installation a bit tricky as tolerances are much tighter than the original.They do have an installation video up on their web site (not sure why they have it on their Amazon listing!) which I referenced several times during the install but it has a few problems:1. They reference some parts that are sold separately, specifically a metal washer and stainless steel bearings (not sure WHERE these are sold as their not on their Amazon store or on their web site, but they said they weren't included when I contacted them). I used the plastic ones that I took off the drive without issue. I'd personally be worried the stainless bearings would damage the bearing races (which can only be repaired with a full spine replacement) so I think I'm happy to stick with the plastic ones.2. They don't note removal and re-installation of the 180 drive locking mechanism on the rear replacement piece (it's noted on the front piece, just not the rear -- and indeed it looks like they didn't reinstall it in their video -- not sure why not). This is the piece of plastic that's spring loaded and screwed into the ends of the mechanisms. I put both back in and things seem to work ok so far.3. Their explanation of which direction to reinstall the plastic rotating disks isn't clear. I ended up doing it backwards once for each. You should operate the 180 drive mechanism BEFORE you start disassembly to fully understand it (maybe take a video) then as you reinstall each disk to make sure it's moving in the right direction.4. This took about 4-5 hours (across three sessions) to complete since it was my first time taking this apart. In their video it looks like it takes about 10 minutes. If I'd do this again I'd plan to do it all in one session which would probably make it go a bit faster.5. They don't have a intro to their video saying all the tools and other materials you'll need. Fortunately I have a pretty well equipped shop so it didn't hinder me but I had to raid my boat trailer grease gun for some appropriate lube.Some pointers on assembly:Make sure you have a large comfortable work space (that can get oil and grease on it),Good lighting was super helpfulHave lots of little bins/cups/etc. (with a lid) for all the bearings. Losing a bearing sucks. There is a fellow out there selling ceramic bearing upgrades (I haven't used them but an option if you do lose a bearing and/or yours are shot).If you're going to re-use the bearings, you'll need to clean them with some plastic safe parts cleaner.You'll definitely want to use good waterproof grease.You might consider replacing all the nuts you loosen. Those locking nuts with a built-in nylon washer aren't supposed to be re-used.At a minimum you need a Phillips screwdriver, a 7/16" nut driver (an adjustable wrench could be used, but it'll be a pain!), an old dead 1/8" drill bit (you'll use it as a punch) and a hammerOther helpful tools were needle-nose pliers, a sharp pointed tool (to undo tight knots), a flat blade driver (to pry and adjust things), tooth picks (to align holes together), a grease brush, etc.. I drilled a 1/2" hole in a piece of 2x4 scrap that let me rest the drive on its side for assembly which was helpful.Getting the thin control lines back into the plastic sprockets was VERY hard -- one would go in ok, but two was too tight. We finally figured out some very thin wire run through (as a loop like a needle threader) could pull the second line though (don't try to pull both though this way as the opening is too small for that -- run one at a time).For reference, there are 15 "needle" bearings in each of the drums, 15 of the larger ones in each of the spine bearings (45 total) and 13 of the smaller ones at the end.Hopefully we get this on the water soon and make sure it all checks out!Edited to add: a water test showed that I'd somehow managed to switch the forward and backward levers. I said those little plastic disks were tricky! It was, fortunately, easy enough to undo the handles on them and just switch those instead of having to undo everything else. I completely understand why Hobie considered the whole spine to be the replacement part instead of selling pieces.Other than that, a very brief water test went well but we're pretty much at end of season here so we'll know for sure next year!
A**R
Great
My sprockets on my Mirage 180 drives broke and I replaced with this item. They worked pretty well! And it is nice to know their teeth won't break like the original one.Has been proved via 68 miles in this year's Seventy48 race! Worked great!
C**M
Good Replacement Product
I don't have much to add beyond what Heather FM said in her review. Very thorough and accurate. I highly recommend marking the discs before you remove them so they can be reinstalled properly. They way they appear, you would not think the direction you put them back matters, but it does. Also, be careful not to let the shifting lines twist around each other while doing install. I was careless and this happened without me realizing it. It caused the lines to bind when I shifted and I had to take the whole thing apart again and fix the lines. A good red grease will help keep the needle bearings in place when reinstalling them. I did not find any alignment issues with the chain, however. Completing the install was much more difficult than anticipated (that is the only reason for four stars...instructions aren't the best.)Everything works great now that it is back together and looking forward to not having to worry about the sprockets again.
M**E
Sharp edges
It was machined well but has sharp edges that make it tough to assemble with tight tolerances.
Trustpilot
1 day ago
2 days ago