


🚀 Upgrade Your 3D Game!
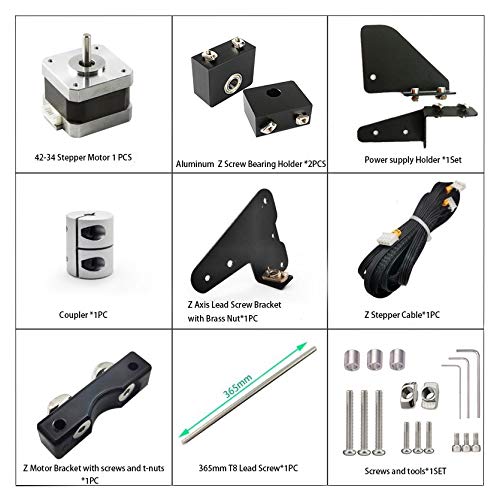
The ENOMAKER Dual Z Axis Upgrade Kit is designed for Creality Ender 3, Pro, and V2 3D printers, enhancing stability and print accuracy. This kit features a robust metal power supply holder and is easy to install, making it an essential upgrade for serious 3D printing enthusiasts.
| Manufacturer | ENOMAKER |
| Part number | ENO-Dual-Z-Axis-Kit |
| Item Weight | 771 g |
| Package Dimensions | 38.2 x 9.09 x 6.4 cm; 771 g |
| Item model number | ENO-Dual-Z-Axis-Kit |
| Colour | Black |
| Material | Plastic |
| Item Package Quantity | 1 |
| Batteries included? | No |
| Batteries Required? | No |
M**K
Great kit
Great kit I put it on my Voexlab Aquila X2 and everything works well. Everything need was included works well would buy again
A**S
Great Deal!
Sadly, this is a much better deal compared to those offered by American sellers. It was about half the price, so I took advantage of the deal and very happy with the kit I received. Can't wait to install it and see how well everything works. Hopefully, products like these will be made in America some day soon and with better quality. Until then, this is a great deal for home workshops.
G**K
Fits well but does need some minor adjustment.
The Ender 3 ins't exactly a perfect machine with square edged between horizontal and vertical planes, so adding a second Z-axis designed to level an inherently non-level surface takes a little bit of patience. Installing all of the main components is easy enough, and the power supply relocation works well for both the factory unit, and an upgraded Meanwell power supply. In order to get everything as square and symmetrical as possible, I would I recommend loosening the couplers on the original motor as well as the new motor, and then re-align them to the motor axle using the same tool or object to keep consistent spacing from the body of the motor. Then before securing the lead screw mounts at the top, run your gantry all the way up and lock it down at that point so that any skew in your vertical posts does not cause undue pressure on the lead screw which causes bending, flexing, and extra pressure when trying to move. Total install was about 45 minutes taking my time to try to keep everything as square and fluid as possible.Leveling the gantry is as easy as unscrewing the bed mount dials until they are loose and the bed is not tightened in any particular corner. Then run the gantry down until it is barely touching the bed on the left side. Move the carriage over to the right side of the bed, unplug the new Z-motor to release the hold, and gently articulate the lead screw until the carriage is the same distance from the bed as it was on the left side. Hold it there while you plug the motor back in. Tighten you bed back down, down a homing procedure, and a bed leveling, and you're good to go! Takes about 5-10 minutes to get straightened out, and only a few minutes to check before every few prints.
R**N
Good but parts needed some cleanup
This is a decent kit and all the parts function as expected but did require a bit of fitment adjustment. The top block bearings were very sticky. I ended up replacing them with higher-quality ones. They are press fit so this took a little work with a bearing puller. The lead screw ships dry, so you need to grease it a little before use. Aligning the 2 motors is a little difficult but manageable with a couple of 123 blocks supporting the x-axis bar and a feeler gauge. We will see if it drifts over time. The power supply relocation brackets are basic but functional. I recommend printing a better poser supply holder.
W**L
One of the best upgrades
It really made balancing the left and right side on the access much more accurate and my Prince come out a lot better I wish I’d known about this first or I would’ve purchased it with the device
Trustpilot
1 month ago
5 days ago