


🎉 Elevate Your Printing Game with X-Smart3!
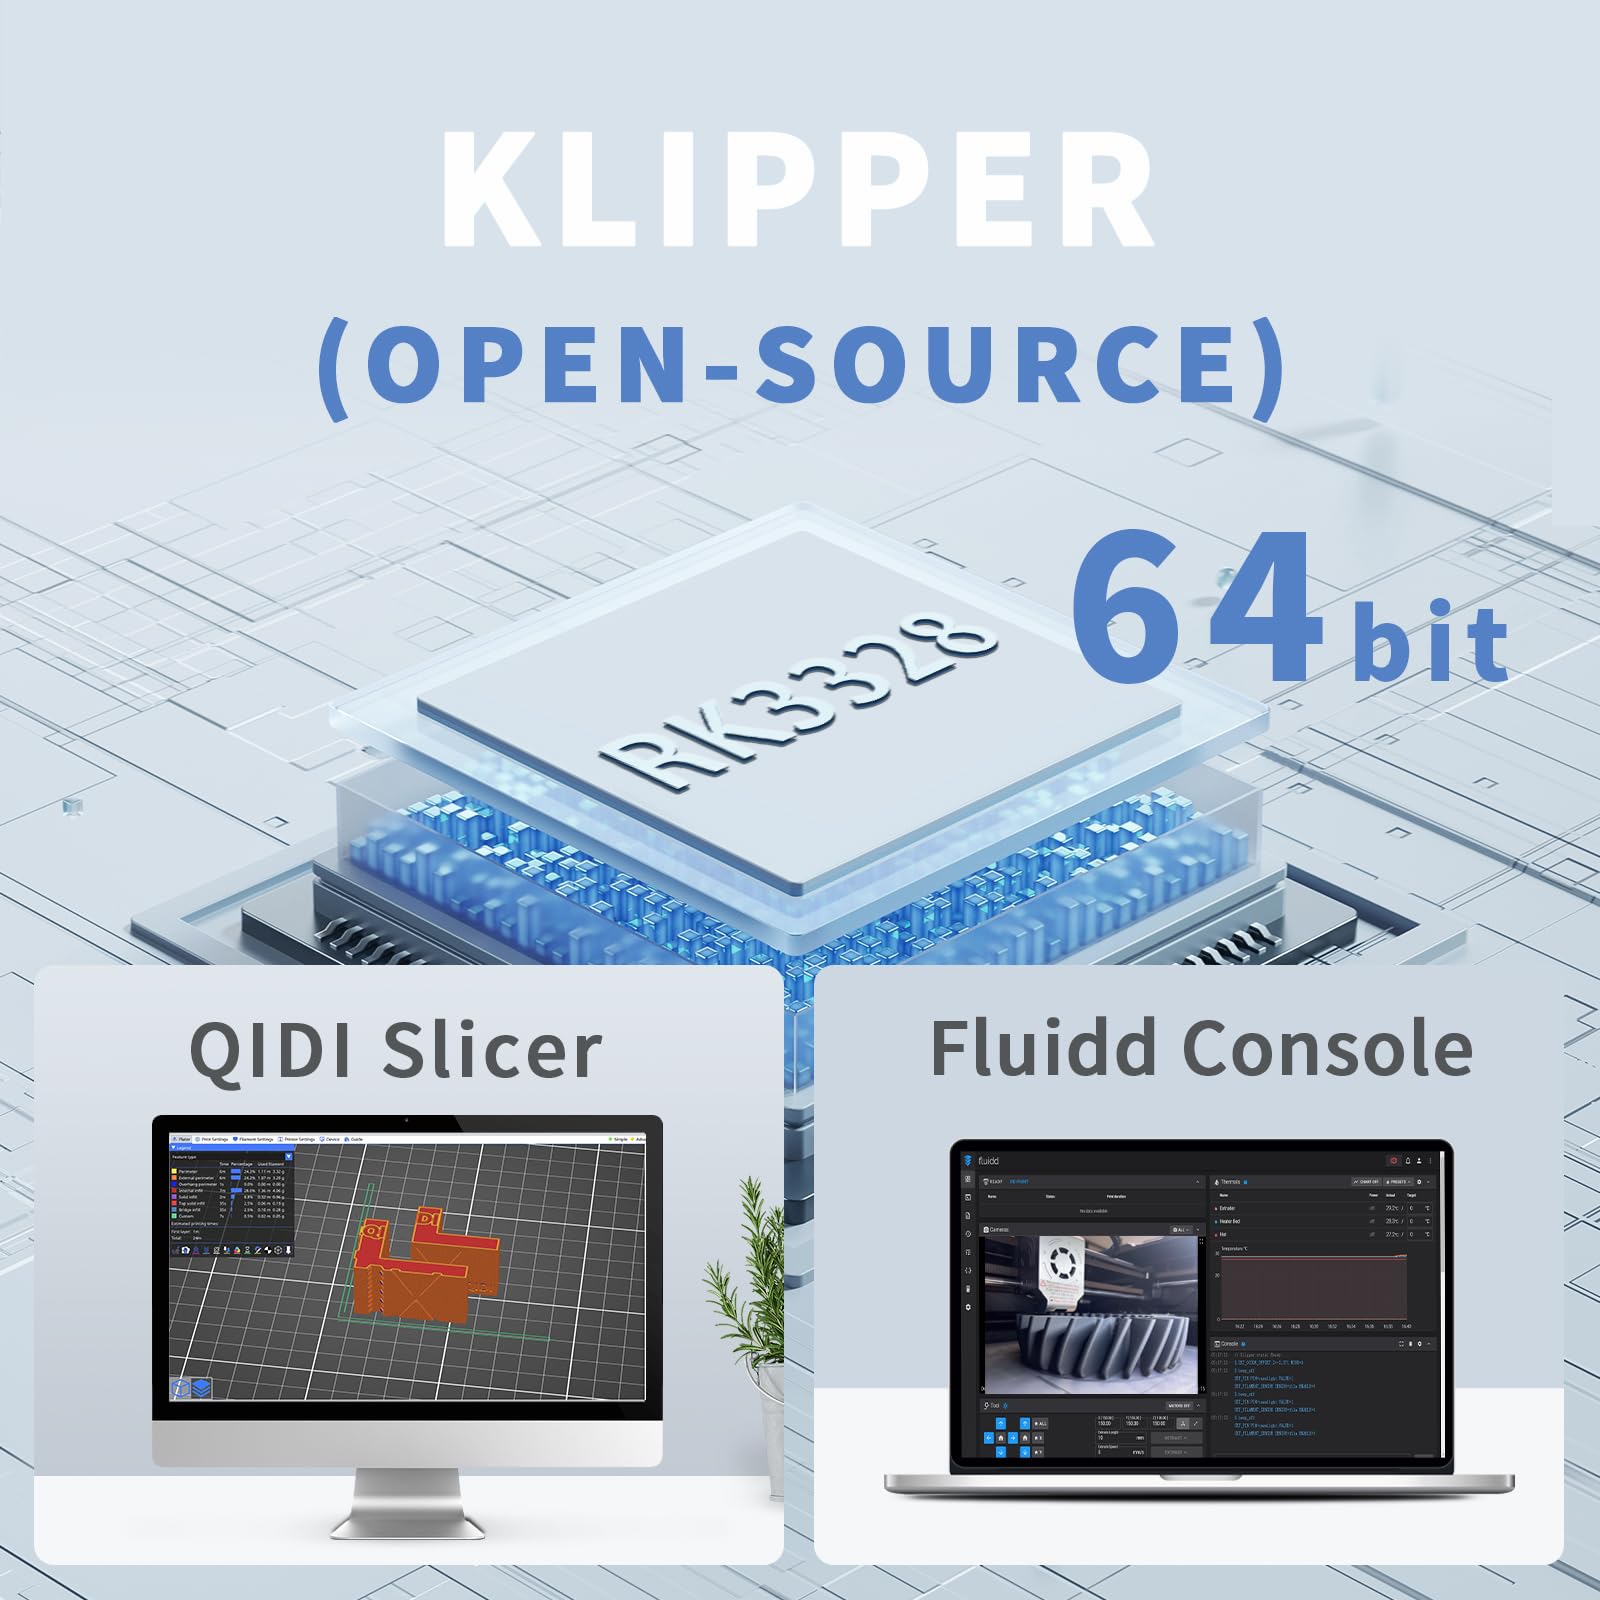
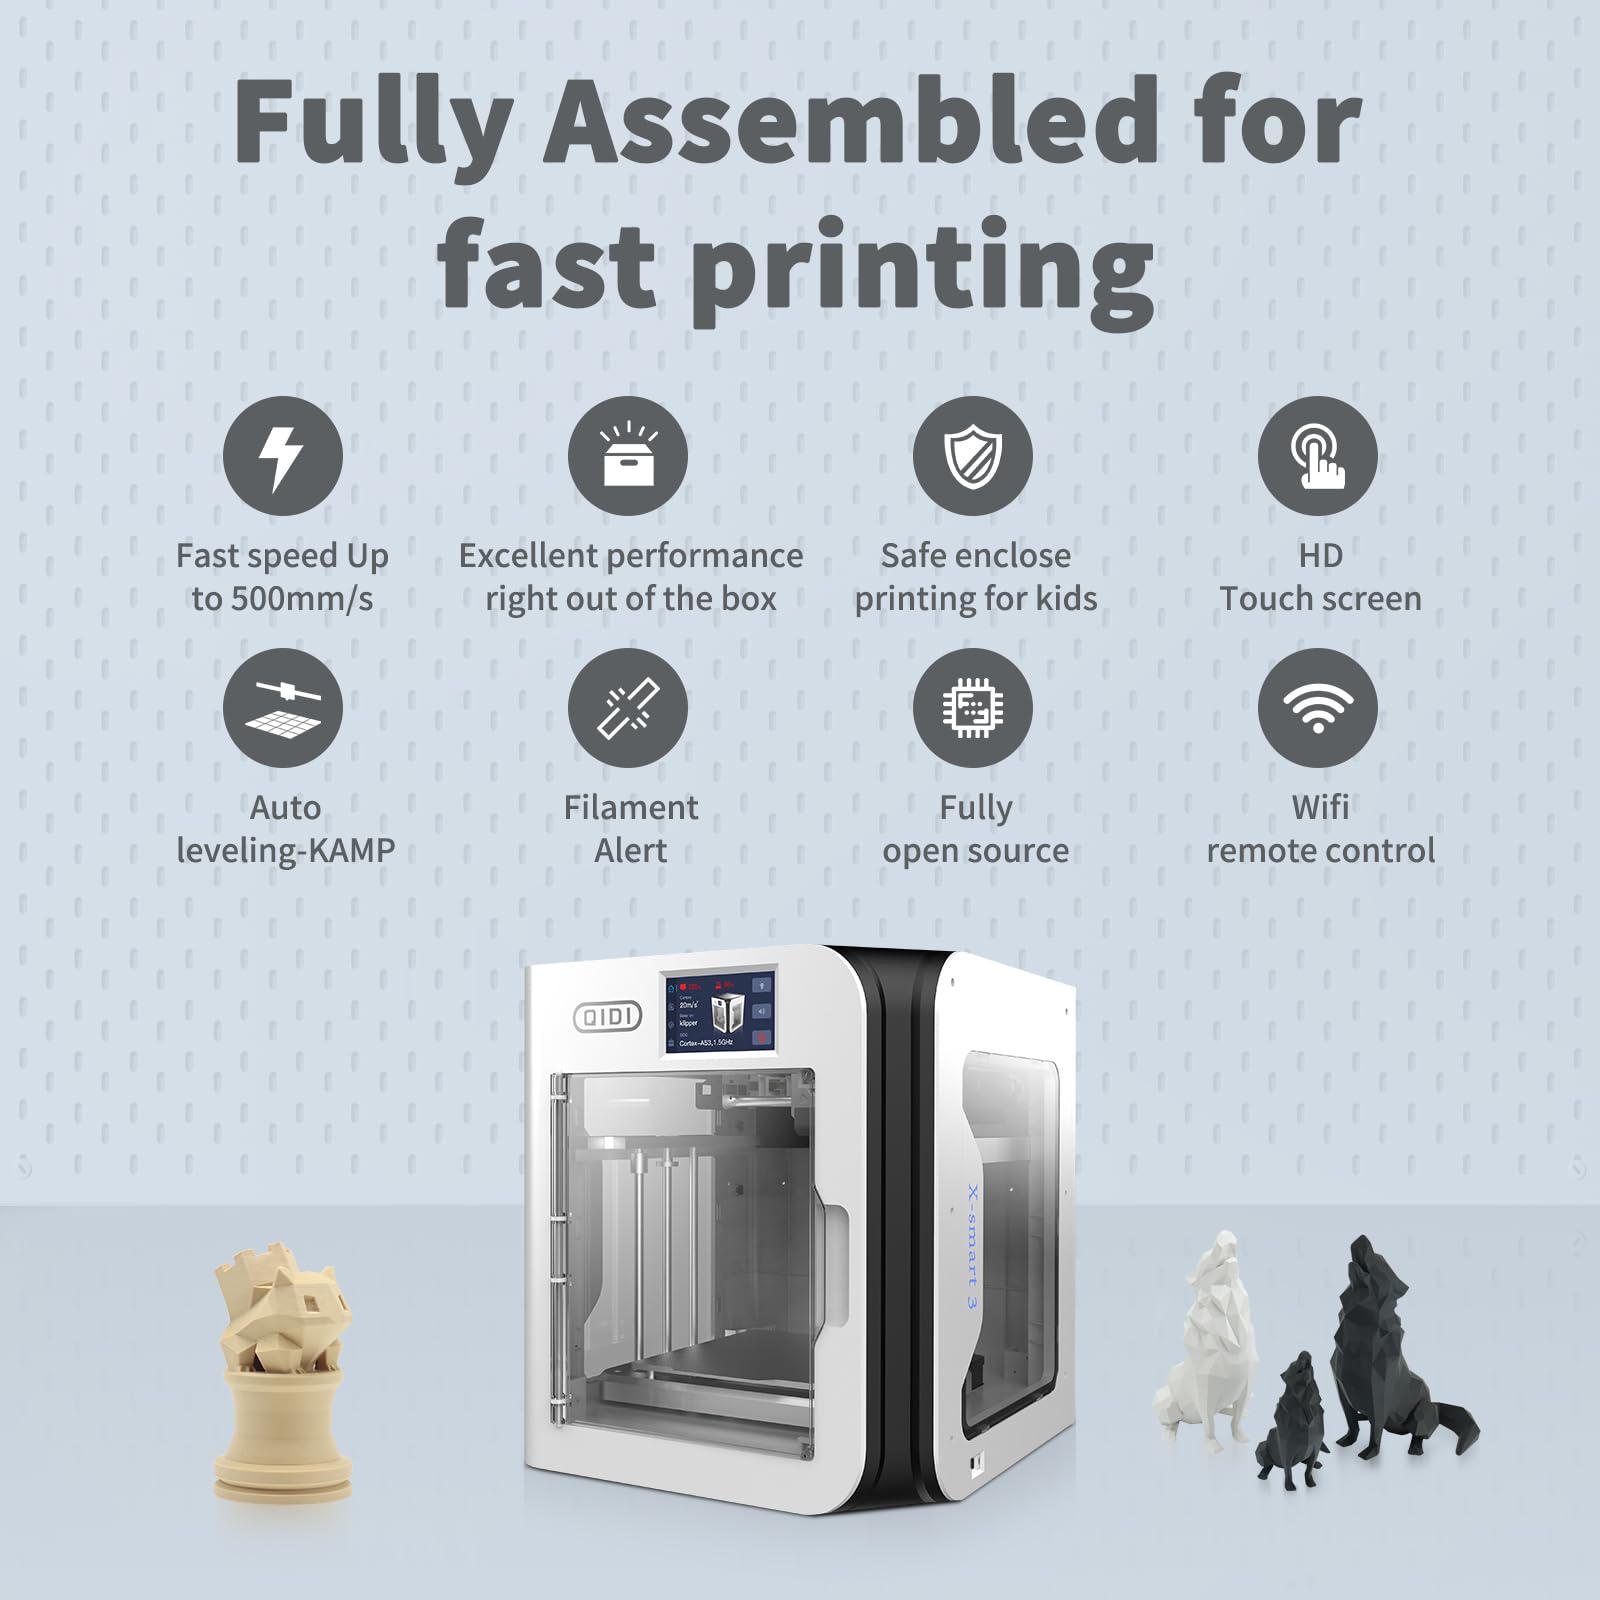
The R QIDI TECHNOLOGY X-Smart3 is a high-speed desktop FDM 3D printer designed for beginners, featuring a 500mm/s printing speed, a build size of 6.89x7.09x6.69 inches, and advanced capabilities like auto leveling and Klipper firmware. With a fully enclosed design and a heated platform, it’s perfect for educational applications and creative projects alike.
| Color | SMART3 |
| Enclosure Material | Acrylonitrile But, Polylactic Acid |
| Printing Technology | FDM |
| Compatible Material | Polyethylene Terephthalate Glycol, Polylactic Acid, Acrylonitrile Styrene Acrylate, Acrylonitrile Butadiene Styrene, Thermoplastic Polyurethane |
| Connectivity Technology | Wi-Fi, Ethernet |
| Operating System | Linux, macOS 10.14 Mojave, Windows 10 |
| Compatible Devices | Laptop, Smartphone |
| File Format | STL,OBJ,STP,STEP |
| Item Dimensions D x W x H | 14.25"D x 14.57"W x 15.63"H |
J**R
My Second 3d Printer best printer for $299(Direct). Best Customer Service
The media could not be loaded. I ordered the unit on a Friday evening over the holiday weekend. The unit arrived the following Wednesday, Monday was Presidents day. It was extremely well packaged and took me about 8 minutes to unpack and set into place.QIDI Tech made it so one no longer needs to remove bottom cover to view the voltage settings(they listen to customer reviews and make adjustments based on customer reviews to their product lines), could easily see unit was set 115 volts! I next plugged the unit in following onscreen instructions once powered up. This is so simple, but make sure you check out a few YouTube reviews to get good understanding of the actual setup process along with any nuisances of setting up this machine, especially if you happen to be a beginner.I received this for third week of February 2024, it arrived with the firmware from fall or the past summer. I decided to stick with the installed firmware version so I could run a quick print test, before upgrading to latest Jan 2024 firmware. My first print was a 17 minute Tug Benchy which was nearly flawless, no elephant foot, great layer lines no glue needed and no stringing. This was a nearly flawless 17 minute benchy, truthfully actual real print time was 14minutes if one does not look at when timer starts and only at filament actually printing the benchy.Once one updates firmware be aware that the whole Set Z routine and leveling routine has been improved and must be done again. Take your time using eyes to ensure you set your Z height perfectly, you will not regret the results in your prints.One must ensure you heat your bed FIRST before doing the needed calibration for bed level routine and Z height adjustment. You still use the included piece of material to set Z height. When you set Z height go to where you feel resistance and push bed closer in intervals of .01mm(if close) until the resistance feels like it grabbing the z height set paper tool with a bit of grip but not so tight it does not move. It should move with resistance that one can feel but not too light of a resistance. You next will do the resonance frequency shake routine which can take up to about 7 minutes to complete. When you do first print it will start with bed level routine and one always can make adjustment to Z during printing. Make sure when you do print add like 3 outer perimeters 3- 4mm away from object being printed and immediately check that the filament is getting flattened properly(have Z open to make adjustments), if the filament coming out appears rounded on bed raise height of bed closer to the nozzle in .01mm increments if you are close. You want to see nice flat layer of plastic on the bed. Your can train eye to see the perfect layer very quickly.One must always preheat table and give it a proper amount of heat soak time(6-10min at set temp) before doing a print to ensure super accurate Z height settings with great repeatability which results in fantastic prints. I was able to get mine dialed in very fast, my Z height difference was something like .-.098(from off top of memory, 0 may be decimal off) when bed temp was at 60C and with nozzle preheated to a resting temp of 120C(settings can be adjusted). This ensures you won't have issues on Z height due to temperature compensation for expansion.*Note, when you upgrade firmware to Jan 2024 updates you must run whole procedure again including the Resonance routine.I was running my first print within 25 minutes of first opening the well packed box! This machine rocks! A key to successful 3d printing is to get your Z height perfected and level done after a proper heat soak of the table and print head at your running temperatures. Make sure you run firmware updates! QIDI TECH listens to customers reviews and they make rapid changes if their new machines need them! They are quick to react to customer questions, just realize they are 12 hrs difference in time change, they offer messaging and email support. I consider them the best tech support yet for this type of machine, second to none in my experience.My second print was a very complicated multi part dust centrifugal force dust collection setup that printed absolutely flawless without supports and was nearly 7" on each side nearing the max print size for the XSmart3 This was the best print I have done in my three plus years of using 3d printing machines, flawless.Software TIP-I love using the new fuzzy hair setting with .01mm setting on height and .25mm setting for repeat distance on only outer wall layers because it does beautiful job of hiding layer lines, resulting in beautiful surface for the outer wall without sacrificing print time by much. The QIDI Splice software is based on the Prussia Slice and is an absolute joy to use very simple interface. I did have minor issue updating the software version initially, but I quickly resolved issue going to GITHUB.This machine hands down is the best 3d printer for beginners and pros alike for $299 if bought at QIDI TECH website,$319 through Amazon. QIDI TECH listens to customers and if needed will make major updates to newly released printers, they offer outstanding tech support. What is not to like? Both of my first two prints were literally flawless. The slicing software rocks and this machine prints flawless prints when one dials in the Z properly and uses good filament. This is easy for beginners and pro's alike, offering superior effortless prints with an amazing high success rates.I am now sold on QIDI TECH and will be going with their MAX3 sometime this year, unless they release a nice dual extruder design or multicolor design. The QIDI TECH XSmart3 is the best bang for your buck if you want a machine that just simply works and works well! Well done!Update- Just ran third print large and complex with the Qidi Tech Abs Rapido set temp 272c n bed at 96c. with lots of 90 degree bridges used lots of supports and this came out flawless first try occupying whole build area. 3 for 3 and Abs came out amazing zero adhesives!
D**4
Outstanding printer for the price!
First off, I will say I only have experience with a fairly upgraded ender 3 pro, so I can't compare this to other core xy printers.This thing is a night and day difference to my ender 3. First off, I love the wifi capability of this printer. It also accepts USB flash drives, but connecting this printer to my home network was a breeze and connections are always solid.It is so nice being able to slice my models in Prusa slicer and just send right to the printer and it goes.Also being able to access all the printer settings in a web browser using fluidd is awesome. You can run macro commands, monitor print status in real time, clean out printer internal storage, move print head and bed, change nozzle and bed Temps, and more all in real time on your PC.Z height calibration is stupid easy. It sets the nozzle to the bed after heating up the print bed, use the included card for slight resistance while adjusting z height up or down, it saves, then you're done.Print quality is really good with this printer. Manages to do really good overhangs compared to my ender 3.I know this thing is marketed to print stupid fast, but do keep in mind that while it can, you also have to be smart and know that quality will degrade on certain models. Dont expect to be printing intricate details at 300 mm/s and get injection molded quality. I generally print slower since time is not an issue with pri ts getting done so I don't know much about the max 300 mm/s and quality.Nozzle changing is pretty straight forward. About the same amount of effort as any other printer I'm sure.I know some people complain about the spool holder on the back, but I've never used it as I just feed my filament in from a dryer box off to the side of the machine. No problems with that.Another pro to this Machi e is how fast the hotend heats up. Using a stopwatch started the Second I hit the heat up button, it went from cold to 200c in 48 seconds. That's lightning fast compared to my ender with a spider hotend that would take a couple minutes to reach full temp at 200. Bed heating up to 60c was clocked at a minute and 38 seconds. Not bad in my opinion.I've done mostly pla on this, but I've done a couple abs prints, and abs printed fairly well, but shined with pla.I also have to say tech support has been pretty good working with me, even though we're in two different countries. Had some questions and they were very good with usually responding within 24 hours.All in all, for the price they're asking, this is a great deal and it's been running solid for about 3 months so far, and dozens of successful prints. I would highly recommend this printer!
Trustpilot
3 days ago
1 month ago