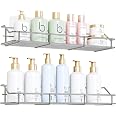
🚿 Elevate your space—no drills, no rust, just sleek organization!
This Adhesive Bathroom Shelf Organizer is a modern, wall-mounted storage solution made from rustproof SUS304 stainless steel. Designed for easy, no-drill installation on smooth surfaces like tile and glass, it supports up to 20 pounds and includes removable hooks for added convenience. Ideal for renters and anyone seeking a stylish, damage-free way to organize bathroom or kitchen essentials.


| Room Type | Bathroom |
| Special Feature | Easy to Install |
| Product Dimensions | 4.33"D x 2.75"W x 13.39"H |
| Style | Modern |
| Finish Type | Finished |
| Brand | OriwarE |
| Size | 2 Pack |
| Weight Limit | 20 Pounds |
| Assembly Required | Yes |
| Recommended Uses For Product | Bathroom, Kitchen |
| Number of Items | 2 |
| Manufacturer | ODesign |
| Included Components | Accessories |
| Model Name | WP58 |
| Item Weight | 1.6 Pounds |
| Furniture Finish | stainless |
| Installation Type | Wall Mount |
| Weight capacity | Minimum weight: 20 Pounds |
| Specific Uses For Product | Inside |
| Unit Count | 2 Count |
| UPC | 606015012122 |
| Part Number | 43528-101017 |
| Item Weight | 1.57 pounds |
| Country of Origin | China |
| Item model number | WP58 |
| Is Discontinued By Manufacturer | No |
| Color | Silver |
| Finish | Finished |
| Item Package Quantity | 1 |
| Maximum Weight Capacity | 20 Pounds |
| Special Features | Easy to Install |
| Batteries Included? | No |
| Batteries Required? | No |
K**.
FANTASTIC! PERFECT! HUGE SPACE SAVER! BUY THIS!
I have a LARGE bath counter, that is always full of my random products. I use more than most, and want the variety at my fingertips. However, the variety was driving my hubby nuts. While he was on vacation hunting, I bought these and installed. They are flipping amazing! they hold so much, install super easy and are just over fabulous! They went on the mirror super easy, and have stayed put since installation 2 weeks ago. It is nice to have a counter surface once again. I would highly recommend these - personally I wouldn't consider anything else. The adhesive is very strong, and easy enough to install. You won't be disappointed if you purchase these!
M**T
Super strong adhesion even to this uneven surface
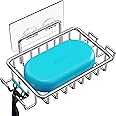
These have been up for a year, stuck to an uneven painted surface! Yes they have separated in places because that was inevitable installing them on a surface the instructions said I shouldn’t 😂 but they are still holding strong and have not separated any more. Also an extra adhesive strip is included so when one comes down (five years from now?) I have another strip I can use. The wire shelves aren’t the best for sample size bottles but that’s to be expected with all shelves that aren’t solid. I really like these for bars of soap! No more soap dishes necessary. Would absolutely buy again - strong adhesive, super easy to install and sturdy! Not the most aesthetically pleasing thing in my opinion but a great option for the price.Let me know if this was helpful
A**R
Everything you could ask for.
So I’m not using one to write the reviews, but I always find myself reading them before I buy. But after a year of use and a product that has exceeded my expectations I had to say something. I know this isn’t a high dollar TV or something to review, but when I buy something I want it to last. This shelf unit is amazing. You can’t be the price for the quality piece you will receive. It has held all of mine and my GF pump soaps and shampoos and much more. I highly recommend this product if you are having trouble deciding, you won’t be left disappointed .For most of the bad reviews of the adhesive not sticking was the lack or cleaning/prepping before applying. I am still in my original two and have a back up just Incase. No rust, no fails ,no issues.
J**M
I have used these in multiple houses and bathrooms
These look higher end than you would expect for a stick-up shelf. Stay put and work great!!!
T**I
Yes, it IS easy to remove. Yes i love them.
Do NOT listen to the harsh reviews relating to the removal process. Those individuals either did not follow instructions and/or lacked the proper items needed. In order for a smooth removal process you need 3 common household objects 1) Blow Dryer, 2) alcohol (medical purpose alcohol NOT drinking alcohol), and 3) a rag (bathing rag/hand towel, wash cloth). DO NOT, i repeat, DO NOT begin with trying to peel the hook strip off the mirror. STEP 1 is to blow dry a little piece of the strip for about 30 seconds and peel that warm section off the mirror, blow dry another little piece of the strip for 30 seconds and then peel that warm piece (keep repeating this process until the whole strip has been peeled off of the mirror) DO NOT worry about the left over glue thats still stuck to the mirror during this step. Just worry about getting the strip removed. Now.... for STEP TWO. Pour alcohol around the edges of the large clumps of glue that remained stuck to the mirror. After pouring alcohol on the glue clumps, they should EASILY peel off on the mirror. (I used a palm rolling technique and rubbed off the glue with my palm but peeling works as well) However there will still be SMALL SMUDGES of glue left on the mirror. Now for step THREE, pour alcohol onto a rag and rub the glue smudges with that rag. The alcohol on the rag will rub the remaining glue right off.Now that the biggest concern is out of the way, i LOVE the rack. It holds up well, i had it for a couple of months and it never fell down even though i had a lot of weight on it. The only reason i took it down was because i am moving. The adhesive strips are not reusable, but the metal trays are. If you move locations, you can order more adhesive strips with the link they provided and just keep the same metal trays if you would like. Its worth the money and effort of take down (if you ever have to take it down).
Trustpilot
2 weeks ago
1 month ago