🦅 Elevate Your Gutter Game with Raptor Gutter Guards!
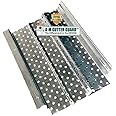
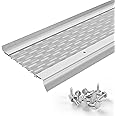
The Raptor Gutter Guard Stainless Steel Micro-Mesh Sample Pack allows you to test both Standard and Super sizes before committing to a full purchase. Made from durable stainless steel, this lightweight sample pack is designed for easy handling and effective gutter protection, ensuring your home stays safe from debris and water damage.


| Manufacturer | Gutterglove |
| Part Number | AMZ6 |
| Item Weight | 2.89 ounces |
| Package Dimensions | 10.16 x 6.65 x 0.43 inches |
| Item model number | AMZ6 |
| Is Discontinued By Manufacturer | No |
| Size | SAMPLE PACK |
| Color | Mill Finish - Sample Pack |
| Finish | Stainless |
| Material | Stainless Steel |
| Item Package Quantity | 1 |
| Included Components | Sample Pack |
| Batteries Included? | No |
| Batteries Required? | No |
M**R
Quality, cost effective solution.
Best gutter guard I’ve come across - sturdy and functional. WAY more economical than the commercial products and relatively easy installation.
J**Y
Good product!
Seems like a good product! Was as described. Unfortunately doesn't work for my situation, but it is of no fault of the product. Glad I ordered the samples first!
A**M
Nice Gutter Guard
Very nice gutter guard. I bought this "sample" to get a hands on look at the item before deciding whether to use this item on my homes gutters. Very impressed with it's quality and have decided to go ahead and order enough of this item to cover all the gutters on my home. It really is very nicely built and installation, while perhaps a little time consuming, is very straight forward.
J**
Good!
Good quality easy to install recommend! Value for money easy cutting good color fit and size!
M**G
Gutter screen for certain roof types.
Appeared quality constructed. But unable to use as it doesn’t fit half round copper gutters on a mansard roof.
R**.
Easy to install. Hardest part for me was cleaning the gutters prior to installation!
Fits like a glove and easy to install!
C**I
Didn’t fit
The sample didn’t fit a 5” gutter
R**D
will it work????? ----- yes yes yes
fit for 5 inch seemed good, for the 6 inch sample piece -------- will order enough to do half the house, will see how it does before ordering more STOP --- i was going to go with 5 stars, because thanks to amazon i was able to get the 9 dol i spent on the sample by returning it. the product will not fit perfect d/t metal roof, but i'll make do. my real gripe is the Brush they hang there hat on ( to give and edge up on competition )- free - ???? !st you scan part of instruction paper to register product, then you fill out forms and there is no indication what the "shipping " will cost BUT it comes without a handle and it is only 6-7 inches wide -- the handle will cost you 69.00 dol-- lets not forget shipping [brush handle can be had on amazon for 12 to 30 dol ] they can keep there "free" brush - i will give an update in a year or so. UP DATE -- UP DATE -- UP DATE ok i got the brush and it looks like it will be needed BUT the screens are preventing clogging , the cleaning has already been reduced ( i still refuse to get there brush handle ) - i am ordering enough to do another section of the house and am now up to 4 stars - will continue to evaluate and up date ----------up date --------had a mild winter so did not push really hard but it still looks good and functions as they indicated ------ up date ------ 1st cleaning and it went well, - covers were "covered" in popler cotton - yet continued to function, - i was prepared to use a power washer to clean them but found a hose on stream worked very well -- i used to have to clean gutters 2-3 times a week in spring and again a repeat in the fall --- looks like one maybe two cleanings a tear now
Trustpilot
3 weeks ago
1 month ago