![Valefod [2 Pack] DC 6-30V Timer Relay Programmable Delay Relay Module Cycle Timer with LED Display / 5V Micro USB, Smart Home Controller](https://m.media-amazon.com/images/I/81WS9ok2FqL.jpg)


⏳ Automate smarter, not harder — your smart home’s secret weapon!
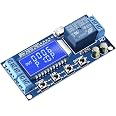
The Valefod 2 Pack Programmable Timer Relay Module offers precise, adjustable delay timing from 0.1 seconds up to 999 minutes, supporting a broad DC voltage range (6-30V) and micro USB 5V power. Featuring a clear LED display with energy-saving sleep mode, it supports high load capacities (up to 10A) and is ideal for smart home automation, industrial control, and more. Its programmable parameters are independently adjustable and permanently saved, ensuring reliable, customizable automation.

| Manufacturer | Valefod |
| Part number | VA-0190 |
| Item Weight | 68 g |
| Product Dimensions | 6.4 x 1.7 x 3.8 cm; 68 g |
| Item model number | VA-0190 |
| Color | Blue |
| Wattage | 3E+2 |
| Measurement System | Imperial |
| Plug Profile | PCB Mount |
| Batteries Included? | No |
| Batteries Required? | No |
Trustpilot
1 month ago
1 week ago
3 weeks ago
3 days ago

![[2 Pack] DC 6-30V Timer Relay Programmable Delay Relay Module Cycle Timer with LED Display / 5V Micro USB, Smart Home Controller](https://images-na.ssl-images-amazon.com/images/I/81WS9ok2FqL._AC_UL116_SR116,116_.jpg)