


🔧 Power Up Your Projects with Precision!
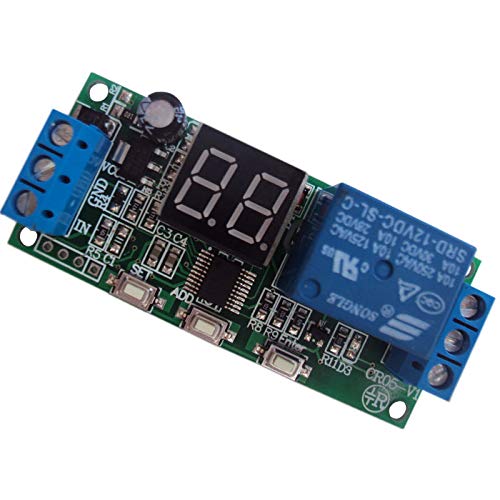
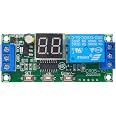
The DC 5V 12V 24V Digital LED Display Infinite Cycle Delay Timer Switch ON/OFF Relay Module is a multifunctional relay module designed for precise control of electrical devices. With adjustable timing from 0.1 seconds to 99 hours, it supports both DC and AC applications, making it ideal for a variety of projects. Its compact design and high power rating of 10A ensure it meets the demands of modern electronic setups.
| Contact Type | Normally Open |
| Current Rating | 10 Amps |
| Brand | ATROFY |
| Operation Mode | Off |
| Coil Voltage | 12 Volts |
| Contact Current Rating | 10 Amps |
| Maximum Switching Current | 10 Amps |
| Maximum Switching Voltage | 24 Volts |
| Number of Terminals | 2 |
| Upper Temperature Rating | 85 Degrees Celsius |
| UPC | 704022167092 |
| Part Number | CECOMINOD021847 |
| Item Weight | 0.634 ounces |
| Package Dimensions | 6.46 x 4.17 x 1.26 inches |
| Item model number | CECOMINOD021847 |
| Is Discontinued By Manufacturer | No |
| Material | Polycarbonate |
| Item Package Quantity | 1 |
| Number Of Pieces | 1 |
| Measurement System | Metric, Imperial |
| Switch Style | Temperature Switch |
| Batteries Included? | No |
| Batteries Required? | No |
M**T
Great Versatile Product
Cool product. Very versatile. I am using it to trip a 12V starter solenoid, which is sending power to welding tips used to weld 18650 Lithium Ion Cells. I have it set to P5 for 3ms. Triggering the timer with a foot pedal microswitch. I have only cycled it about 200 times, but it has performed flawlessly. The only problems encountered were operator error. There are no instructions enclosed. Print the basic commands in the Amazon "Product Description" and it will help. Also, one of the product reviewers had some good information on how to set the parameters.
W**E
Needs better quality control, New replacement works fine.
I received this yesterday and had high hopes for this little module. I've used these before, but this one is a dud. Specifically I'm not able to adjust the T1 time using the "Add/-" button. The time is stuck on 99. No matter what I try it will not adjust. So, back it goes. I would give it a higher rating if it wasn't broken. I'll update this review when I get a working replacement.Update 5/29/20: Just received the replacement for this unit and it works as intended. I'm using program P1 with a countdown of 30 seconds with trigger. Nothing complicated, simple application. Works great.
Z**Z
Works as described but takes a little time to decipher instructions!
This small device works fine once you decipher the wiring/programming instructions. If it is not clear to you from the pictures and wiring diagrams, the terminals on the left in the picture marked DC+ and DC- only provide power to this little relay module, not to the thing you are trying to control. What you have to do is create a circuit from a power source (AC or DC) to the thing you are trying to control, and then interrupt that circuit by running it through the "relay" side of this little device on the right side, marked COM and NC/NO meaning normally closed/normally open (see picture for a working DC setup). What this relay device does is simply connect the COM terminal to the NC or the NO terminal (known as "shorting" that connection) depending on your program (actually COM is connected back and forth between NC and NO as the relay turns "on" and "off"). You can also optionally connect something that provides an electric signal as a "trigger" to the left side of the device if you want to start your program when this trigger signal is received instead of having any saved program begin as soon as this relay unit is connected to power or a new program is punched in. You can use the same 12v DC power supply to both power this relay AND power your controlled device if the power supply has sufficient amps, but they have to be wired in separate circuits ("in parallel") with the controlled circuit going through COM and either NC or NO like you would with a light switch - the power won't pass through this relay unit to the COM/NC/NO terminals, the relay only flips the connection to COM back and forth between NC and NO. The trigger programs are to be used only if you have an electric signal device connected to the trigger and DC- terminals, otherwise stick to P1-P4. The written description of the programming steps for P3 P4 also did not match exactly what appeared on the LED screen, but the sequence for both T1 and T2 is first select time units (tenth seconds, seconds, minutes, or hours), then you select the number of units to be used.
S**N
Works fine - hard to program.
The instructions are horrible, and in multiple pieces. About the worst I've seen.That being said, the unit itself can do almost anything.
K**O
Very easy to set up and operate
Very easy to set up and operate - reliable
J**R
A little confusing to set up but works great.
Used this on a Solar Cell charging set up to control a lighting.Love having so many configuration options...Setting it up is a bit confusing & not intuitive so expect to spend some time to understand how to set it up using try, try & try again.
G**S
Junk possible from China.
First of all, the relay didn't come with instructions, other than what is in the order description. Following the instructions, it does nothing. It just sits with the desplay showing "00" no matter what button I press or for how long. The instructions were written by someone where English is not their first language. They talk about the "Set" button and the "Add" button but not the "Enter" button.
J**M
An intro
Seems to work and I was able to reproduce the modes I tried. Mode P2, for instance, just requires one "time value" so it's easy. It's called Delay-off. You long-press the set button and it shows P1 then press set again and you get P2.Next to set your time range press the add button. -0 is tenths of a second. -1 is seconds. -2 minutes. -3 is hours. So pick -2 for minutes and press set to confirm.Next you see lower case t 1 so press the add and subtract button to get a 3, for 3 minutes. Then press Set to confirm.Since the unit is on, it will immediately apply closure to the NO and Com terminals. For 3 minutes then turn off.You will see a 2 for one minute and a 1 for one minute and a 0 for the last minute. Then stop. In trigger modes it won't start until you apply ground to the IN connector.Other modes may require two Time values and a lowercase t2 will appear and you set time range like -1 (seconds) then 5 for 5 seconds, then Set.Hope it works
M**Z
Se ve muy práctico
Aún no lo instaló pero de acuerdo a algunos vídeos tiene muchas opciones de configuración para utilizarlo en diversas aplicaciones
Trustpilot
2 weeks ago
5 days ago
![[2 Pack] DC 6-30V Timer Relay Programmable Delay Relay Module Cycle Timer with LED Display / 5V Micro USB, Smart Home Controller](https://images-na.ssl-images-amazon.com/images/I/81WS9ok2FqL._AC_UL116_SR116,116_.jpg)