🐣 Hatch Your Dreams with Ease!
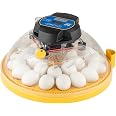
The Brinsea Maxi 24 Advance Egg Incubator is designed for serious breeders, offering automatic egg turning, a digital interface, and a clear dome for optimal visibility. With a capacity of 24 standard chicken eggs or 12 large eggs, it features a flexible quadrant system for various egg sizes, ensuring successful hatching across species. Its durable design and easy maintenance make it a reliable choice for any incubation enthusiast.


| Is Electric | Yes |
| Material Type | Plastic |
| Color | Yellow/Blue |
| Item Weight | 4 Pounds |
| Capacity | 24 load |
| Item Dimensions L x W x H | 12"L x 12"W x 8"H |
P**K
Well made...very reliable for years...and easy
I knew before I purchased this incubator that I love it. I have been borrowing one from a friend for a couple of years. She uses hers too much now to loan it out. So I knew the Brinsea would last. I looked at some cheaper units, but there was no indication in the reviews that they had been used repeatedly. I'd rather pay more upfront for a good unit than have to replace after a few uses.I will be hatching Serama chicks. I have a prize hen whose offspring should be salable and show well, so I wanted a really reliable unit. This incubator is so easy to use. It's set and then pretty much forget except for adding a little water every third day or so. (They have added a place where you can add water now without opening the incubator. A great improvement.) The temperature and humidity are regulated and the eggs are automatically turned. You can set the temperature and turning to your specifications. You can see on the top how many days are left until your hatch is expected. 2 days before the due date I remove the egg turning plate. The incubator knows to quit turning. I cut a soft paper towel to fit the bottom so the chick's feet won't slip and add more water to raise the humidity. The Brinsea comes with a corrugated pad for chicks to stand on but the corrugations are too deep for Serama chicks. They're much smaller than regular large fowl chicks. You can see the chicks pipping and hatching quite well. If one has trouble you can see and gently help. I'm not expecting a great hatch rate since I'm collecting eggs from one hen, some eggs will be nearly 2 weeks old. I'll add to this later if need be.One more thing. For Serama eggs I bought the additional small egg turning plate. It has 12 holes for eggs instead of the 7 for large fowl eggs. This is a small incubator but I"m a small operation. 12 chicks would be plenty for me and probably I'll end up with closer to 6. That's fine too.The only thing that I don't enjoy about hatching my own eggs is cockerels. If you buy sexed eggs from a hatchery you're all set with little baby pullets. If you hatch your own unsexed eggs, on average 60% will be cockerels. That's a pretty reliable statistic. I struggle with having enough hens to pair with cocks.
A**W
Great starter incubator!
The media could not be loaded. Great incubator for a small farm! This is the first incubator I have ever used, and I managed an 83% hatch rate on my chicken eggs (which I hear is really good!). 20/24 eggs successfully hatched; the other 4 were not viable at the 10 day mark, so these may have been a fertility/egg viability issue. I followed the instructions that came with the incubator and it worked perfectly.It monitors ambient air temperature of the room, which helps to make sure it functions optimally. I had to move it to a climate controlled space, and kept the air temperature around 67°F. There is no humidity gauge, but the incubator instructions tell you how to maintain a good humidity level. The water input spout is small but easy to judge if more water is needed, which I was able to keep in check by adding water 2x a day.Zero smell until hatching began, then it was only right over the machine.Cleaning is no mean feat- hatching is dirty business! the bottom tray was easy, but the cover had to be partially disassembled to properly clean, which should probably be done after each hatch. The manual covers cleaning the machine as well, so I had no problems figuring it all out.
C**N
Awesome Product, Awesome Company!
I purchased this incubator for hatching Serama chicks (which are notoriously difficult to hatch). I also bought the optional egg insert for bantam eggs (purchased separately) for this purpose.The incubator worked wonderfully. Successful hatch and it held humidity (I live in mid-FL) and temp perfectly. Turner works as advertised (though I did not use it for this hatch as I had shipped eggs with displaced air cells). This incubator has an lcd display and settings that allow you to personalize the temp, days to hatch, turn time, etc... so no matter what bird you are hatching, this should work to make your life easier.I had an issue with the incubator, as the alcohol solution I used to clean it after hatch caused the plastic dome with new antimicrobial plastic to cloud and degrade. I called the company and a human being answered on the second ring. They listened to my issue carefully, had me email in pictures, and are investigating the issue. They sent me another incubator to replace the one with issues as well as a return label for the other incubator.Bottom line... It is not often you find a product that is this well-designed with a company willing to stand behind their workmanship with such integrity. I will be using their products from here on out for ease of use and reliability.Thanks Brinsea!!!
Trustpilot
2 months ago
4 days ago