🔥 Heat Up Your 3D Printing Game! 🔥
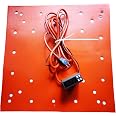
The FUNGDO Silicone Heater Pad is a high-performance heating solution for CR-10S5 and CR10S-5 3D printers, designed to reach temperatures of 100°C in just 10 minutes. With an easy-to-use digital temperature controller and an independent power plug for enhanced safety, this heater pad ensures a smooth and efficient printing experience.
| Brand | FUNGDO |
| Manufacturer | Shenzhen Fundo Smart Technology Co.,Ltd |
| Model number | Heater510 |
| Number of Memory Sticks | 1 |
| Item Weight | 1 kg 500 g |
| Package Dimensions | 58.42 x 15.24 x 10.16 cm; 1.5 Kilograms |
| Item model number | Heater510 |
| Are batteries included? | No |
M**.
Excellent upgrade
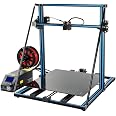
My Creality CR10-S5 comes with a heater that is a fraction of the size of the print bed. The Creality heater doesn’t heat the whole bed, and takes as long as 30 minutes to heat up!Adding this full size heater was easily the best - and nearly mandatory upgrade to this machine!Set your bed temp to zero in your slicer. Use the control box on the new heater to set your bed temp.Heats very quickly, typically less than one minute!
J**T
Solid bed heating solution
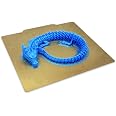
In the end, was easier to apply and use than I thought, once you get into it and get into the groove of things.Only caveat is to MAKE SURE the wires connecting to the control unit are tightly and neatly screwed in. Any stray wires can lead to current leaking and blown fuses within the control unit. You do not want that happening. After having had 1 control unit blow up due to what I had suspected was voltage issues, and having the 'appropriate' replacement sent for my region, I've realized that the issue is less to do with the control unit voltage, and more with any possible exposed wires. Handle the control unit with care, since any strong tugs could dislodge the cables.Open the package, peel back the adhesive sticker, and apply the orange silicone pad to the back of the build plate for the CR10S5 as pictured. Simple and straightforward.Once applied, hook up directly to the mains and bypass the CR10S5's control unit directly with regards to the heating by unplugging the build plate plug entirely. Screw back in the metal bars/heatsink, and/or apply foil to help with heat insulation to retain heat/save energy usage as you will.With your slicer, (I use Simplify3D) go to the temperature settings and set your build plate's temperature to 0 (As shown in the picture) or remove the heated plate as a heating item as part of the procedure entirely - this should send the signal to the printer's control unit to not heat build plate up and to print on a cold plate that is unplugged, and the plate itself is heated manually by yourself by turning it on the power for the pad.As for performance: WOW. I was skeptical of how fast the build plate would heat up. The default heating set up with the CR10S5 usually took 15 minutes to heat up to 60 degrees Celsius. I wasn't expecting Fundo's to take less than 30 seconds. It is insane. And impressive. For the price. It is a solid upgrade.
K**N
Lasted 3 months
Bed gets to 60 degrees in about a minute or so. Glue stuck to back of bed very well. Control works great, but instructions for setting it up could be worded a bit better. Still, I was able to figure it out.The bad thing is this only lasted 3 months before the wires came loose. Even with my attempt to make sure the cable didn't wiggle around by creating a better strain relief than it uses, the cable is just so heavy, it's unavoidable. Not even sure if I can fix it, because the connections are covered by silicone, but I am going to try.Pros:Heats super fastInstalled easilyBed heats much more evenlyCons:Instructions could be worded a bit betterCable is pretty bulky, and a bit hard to manageOnly lasted 3 monthsInstall instructions:Before you start, make sure you are working on a nice flat surface, that is free from dirt and debri!1. Remove bed from printer and remove the aluminum framework and pcb bed heater.2. Clean back of bed with alcohol.3. Before removing backing from heater, align it to the bed adjustment holes.4. Use your bed clips that hold your glass plate on and clamp the heater to the bed along one edge.5. Lift up the edge of heater on opposite side of the bed (side without the clips), and peel the backing about 3" back, and fold it back away from the exposed edge of the heater.6. Carefully affix exposed edge to printer, ensuring the spring holes are lined up.7. Press the heater down, working from center out to get the bed nice and secured to the bed.8. Remove clips from other side and reach between the heater and bed and grab the backing that you folded under in step 5. Pull the backing out slowly, making sure it doesn't tear around any screw hole.9. Work from center out, pressing the heater to the bed. It might be good to use a rolling pin.NOTE:If using the included control unit with this, and not installing a relay and using the CR10 to control it, you need to at least keep the OEM thermistor plugged into your printer's motherboard. Not having this plugged in caused my stepper motors to be jittery. You can however remove the mosfet for the bed, and cut off the positive and negative leads that go to the rear panel connector. All you need is the thermistor wires connected.
J**N
WOW!! Great Product
I had heard horror stories from others about the factory installed bed taking for ever to heat and prints failing. I did not try the factory installed bed at all I just installed this new bed heater. I installed it in 30 minutes, having a drill and Allen adapters for disassembly would have cut the time considerably. The heater has to be turned off separately from the creality printer. I just have it on a power strip and turn the strip itself off.Pros- No failed prints ( dobstfy print bed helps) Plug and play once installed Fairly easy installCons - I wish there was a wiring diagram to install the factory thermistor into the new large bed heater control unit. I don't like having the wiring for the factory plug abandoned. To solve this problem I Put the factory thermistor in the corner of the bed to monitor temperature. It helps to get an average temperature and ensure the entire bed is heated properly. the 2 power cables are tucked away with wire nuts on them for now. I wish there was an on off switch for the unit, a relay to power the unit on from the main board. even still if you pause the print with the factory bed you loose heat and risk print failures. at least this way the bed stays warm if you run out of filament. I wish the wiring was black. The temperature is a bit touchy and can vary between center and the edges by 3-4 degrees CAll in all for $129 bucks it gives you the full capabilities of this printer and function for me out weighs every con at the end of the day I just want the thing to produce a good print with minimal head ache. This bed does that so 4 stars it is.
D**H
Pretty awesome, but requires a small work around.
Perfect fit. Nice durable cord to prevent shaffing. Keep in mind when disconnecting your old heater from the creality motherboard your system will read -14 by default. Simply setting the slicer bed heater to zero will not bypass the heat bed error message. You have to make gcode think its looking for a -14 degree temp. To fix simply open the gcode with a file editor, go to the bed temp line and set it manually from 0 to -14.Other option is to connect the heater in line to your powersource and motherboard, but you will need a correct solid state relay.Other than the small work around its totally worth it. Nothing like a 500x500 bed getting fast and even heat.
Trustpilot
2 weeks ago
3 weeks ago