🚢 Own a piece of history—build the legend, feel the legacy!
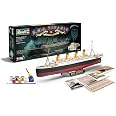
The Revell R.M.S. Titanic 100th Anniversary model kit features 262 plastic pieces to assemble a 67 cm long, highly detailed 1:400 scale replica. Designed for ages 10 and up, it includes professional-grade glue, paintbrush, selected aqua paints, and collectible memorabilia, making it a comprehensive and immersive build experience.
| Manufacturer recommended age | 8 months - 8 years |
| Item model number | RV05715 |
| Manufacturer's Suggested Maximum Weight | 3 Kilograms |
| Language: | English, Italian, Spanish, German |
| Number of pieces | 262 |
| Assembly Required | Yes |
| Scale | one-four-hundredth |
| Batteries Required? | No |
| Batteries included? | No |
| Material Type(s) | Plastic |
| Remote Control Included? | No |
| Colour | Various |
| ASIN | B004DZOHPM |
G**E
Excellent model, definitely not for beginners.
Incredible looking model and big at 67cms (26") long, but not for the faint-hearted. Not particularly difficult to assemble, but many, many parts lots of which are very delicate so cutters are required rather than twisting them off. This model will take you weeks and months, not hours and days. Be aware that although basic paints and glue are supplied, you will need to buy more to complete the model using all the colours specified in the manual. I also ended up having to buy more white and ochre as what was included wasn't quite enough. The hull red is very thick so I watered it down quite thinly and put it on using lots of coats. Essential also is a set of basic modelling tools - craft knife, sprue cutters, sanding sticks/paper, needle files, masking tape, tweezers, paintbrushes (the supplied one is horrible). Model filler is also useful to get rid of the seam when joining the two halves of the hull together. Because this model is (I believe) from a mould made in the 70s, there is quite a bit of extra plastic (flash) on some of the parts which needs to be trimmed off and sanded. This can be a little tedious. I also found the decks needed a bit of sanding to fit properly. This was no bad thing as this kit is almost like a complete modelling course - the easier bits are at the start, and it gets more tricky and fiddly as you go on but at the same time you're getting better and more confident. This model was my first 'serious' build after getting back into the hobby as an adult, and is no longer up to my own standards as I now use an airbrush to paint but I'm still very pleased with it and learned so much while building it.The paint scheme and rigging in the instructions are not quite correct, but there is a wealth of information online, especially the TRMA (Titanic Research & Modelling Association). The funnel colours in particular are a tricky subject, there is no definitive answer so I just mixed colours to get close to the samples on TRMA and I'm happy. The mix recommended by Revell is too yellow. I used a stretchy knitting elastic called 'Prym Gold Zac' from a sewing shop for the rigging, and coloured it with a black marker before fitting with superglue. Much easier than trying to keep the supplied cotton thread taught. The flags are supposed to be just folded back on themselves but I put a bit of foil in between so I could bend them to look like they're flapping. Unfortunately for me this kit has led to a serious case of advanced modellers syndrome, the main symptoms of which are a depleted bank balance, a house full of modelling stuff, a wife rolling her eyes and the owner of the local model shop holidaying in the Maldives.
M**D
With experience and ideas you can make a great kit that lights up.
Did a lot of studying on the net and decided to go for this Revell kit and this scale with an idea of lighting it up. Downloaded the assembly instructions before buying to see how it could be lit and how easy the rigging was to do. Also downloaded pictures to help get the details correct. So much material on the net.Covered the inside of the hull with silver paper to reflect the LED bulbs that were mounted on the hull bottom, drilled all of the port holes on the 'show' side and cut out all of the required decks so that the light could be detracted upwards.Also added small LED's to the 'small square rooms' where light could not get to. The mast lights were done by using fibre optics. To stop the light showing through the plastic on the outside I painted internal walls matt black.Overall, a great kit to build if you are patient and want detail. The only downside is some of the quality of the molding and reminded me of the early Airfix days where flashing had to be trimmed from the delicate parts.Once done and put inside a glass display case it looks amazing and will be admired by visitors.
D**E
Good model, if you have the patience.
My wife bought me this model as a late birthday present.As a bit of a Titanic Enthusiast, I saw this model especially as it was the 100th Anniversary Edition as great challenge to build, as ive only ever done smaller models, my last being the Mobeius Battlestar Galactica Colonial Viper.When I started this model, I was amazed at the sheer size of it, but from the start I saw a bit of what was to come.The 2 halves of the hull were made in black plastic, which I thought was great at first with painting the purple lower & black upper, but when it came to painting the upper deck part was a real pain to do as it took me 2 coats of primer & 8 coats of white to get it perfect, as any model maker who uses brushes will agree to paint white can be a right pain to lay down.On the inside, as I saw on youtube videos, others did not paint the inside upper deck part in white, which I decided to do, and I settled on 3 coats as it would not be really that visible.Then after a few weekends (as I dont get time to work on it during the week, with work) I finally started the deck by deck construction, which TBH wasnt too difficult, then came the main top deck.I was pleased however that the deck by deck construction the plastic was moulded in white, but be carefull when removing the peices off the sprue, some of the peices are so small and niggly, they can be easily damaged when trying to remove them from the sprue, as I found out a number of times.The railings were especially niggly to do, as some of the sections were really small & could only be glued in using tweezers to hold into place, and required you to build one peice of railing by glueing 7 or 8 sections together, where as other parts of railing would be just one peice, which I was thinking why couldnt this particualar section(s) be just one peice.The smoke stacks painting instruction said "90% Yellow to 10% ocher brown" to get the dark orange was totally off too, I settled on looking at Titanic model pages and they said historcally the stacks were a colour called "Buff" and the closest I could get I decided on Humbrol No 24 "Trainer Yellow", and it went down great.Also the rigging thread is quite tricky to do, especially to the masts from the deck, but one thing I thought was strange, that there were lots pre-drilled holes in the decking but Revell decided not to drill a few key essential holes, and it tells you on the intruction panphlet to drill to which I had to buy a dremel type hobby drill.The decals went on great apart from 2 mast flag decals as they tore on me, so im going have to get some more.The paint is completley inadequate like an above poster said, and I had to spend £15 on extra paint (you will need it)With my little rant over & now shes finished, for an amateur model builder Im really pleased on how she turned out, with a few flaws, but again its great for me.If you like a challenge, then this is the model for you.
Trustpilot
2 months ago
1 month ago