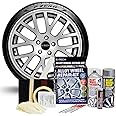
✨ Restore, Revive, and Roll Out!
The Complete Alloy Wheel Refurbishment Repair Kit - Silver (AW-KIT-01) by E-TECH is your ultimate solution for restoring alloy wheels to their original glory. This comprehensive kit includes high-quality lacquer spray, alloy wheel paint, putty, and all necessary tools to ensure a seamless repair process. With a focus on durability and ease of use, this kit not only enhances the aesthetic appeal of your vehicle but also increases its resale value.


| Manufacturer | E-TECH |
| Brand | E-TECH |
| Product Dimensions | 24.2 x 16.99 x 8.4 cm; 1.08 kg |
| Manufacturer reference | AW-KIT-01-ET |
| Manufacturer part number | AW-KIT-01-ET |
| Item Weight | 1.08 kg |
A**B
Make sure you see plenty videos
I have never done that before. This is an excellent product if you have some time and are patient. If you try shortcuts, you will make a mess and either give up or, if you are like me, try again and recognise your mistakes.The results, in my opinion, were pretty good.My main advice:Make sure you stick to drying times.Also, in my second attempt, I used a spry prime bottle. It is a pain that you put before you pain the tyre.(I will attach a pic, it is like kind of white paint) It does make a difference. You can get those bottles from the same manufacturer.Make sure you take the tyre and spend your time masking and covering all the rubber. You don't want to clean that later if you make a mess.Make sure you mask everything that you don't want to paint.I did the job inside the garage in the summer. Remember that it needs to dry, or you won't be able to use the car, or you will have to use the spare tyre.You don't want to do only one tyre. This will be terrible.You will need more than one spray, so do not use the spray too close or in an area with the wind. If you make a mess. Recognise you did it wrong, take the pain off, and re-do it. If you don't, you will later, I did that mistake.You could do one side of the car first and then the other.It is not a five-minute job. You will be fine if you are patient and can repair things in general. There are plenty of videos. Check them out.My job it is not perfect but I was quite happy doing this project and it took sometime because some of my alloys wheels were severe scratched.
Y**Y
Take your time, it's worth the effort
I'm a novice when it comes to alloy wheel repairs but thought I'd give this set a try to repair 2 kerb rashed alloys, one of them half the circumference of the wheel. I decided to do 1 at a time so I could learn from any mistakes and tune my approach on the 2nd alloy (I'd definitely recommend you do that if you have not done this type of thing before). Having plenty of time on my hands I decided to follow the advice and took my time to be as careful and meticulous as possible. Apparently it's all about the preparation and I can confirm that is sound advice. The supplied abrasive papers and files provide a good selection of items to grind down and smooth out any gouges. The next step is to mix the filler. I found that it was relatively hard to start but quickly became malleable and changed colour, just as the instructions suggested. The compound is a little like plasticine and was easy to spread into the areas requiring filling. Leaving it for 10 minutes or so it quickly started to harden and after an hour it was like iron, ready to sand down in preparation for spraying. I was impressed with how well the hardened filler smoothed down, what I would say is do not apply too much, it's really hard and so the more you apply the longer it will take to sand and reshape to the original wheel profile. It's important that you ensure that the wheel is super clean at this stage, the alcohol wipes work a treat. After carefully masking the tyres I was ready to spray. The silver paint goes on smoothly and matched perfectly, I did the whole wheel first time around (on the second wheel I just did the affected area which is a much better approach). The lacquer was next, again this goes on nice and smoothly. I am impressed, however there are a couple of things that knock off a star. On filling the second wheel the compound seemed much harder once the tube had been opened, to an extent that I could not work it to a texture where I could apply it. I cut further down into the tube and then found it would not set as I had not worked it for long enough. You really need to ensure that you follow the instructions. Also, I find that the lacquer doesn't gloss up to that "wet look" as well as the original finish, in fact it seems to be a bit "matt finish" in areas. I think this is probably down to the preparation. All in all I am very happy with the finish and would recommend. However, you must follow the instructions to the letter and take as long as possible to go through the process. Great value
K**T
Excellent finish.
Very straight forward instructions, clearly explaining that the quality of the repair will give a much better paint finish.After the first coat of paint I could still see faint lines where the damage was. By rubbing down with very fine wet and dry paper, filling with fine finishing filler, I was able to completely blend the repair into the surrounding area by painting. After putting the lacquer on the repair the damaged area could not be seen.Very pleased with the result!
J**N
Great little kit!
I bought some cheap beat up old alloys for my car to give me something to do during lockdown! These wheels were horrible, most of the work was in the sandig as the corrosion was really bad, but once it was smooth I could crack on.The filler is brilliant but a bit fiddley so take your time with that. For a better out come as well I bought a primer before spraying the wheels. The colour is great and looks good!I would recommend buying a pack of more paint if you're doing all 4 wheels from scratch. I bought a pack that had 2 silver paint cans and 1 clear coat in addition to the stuff you get in this pack.Here's my results. only just got them on the car so time will tell if the paint holds up.overall I'm very pleased
R**S
Good for a painted finish wheel
Great DIY kit if you’re finishing on a solid colour wheel but suggest not using on finished metal as leaves silver finish on polished alloy.
L**A
Surprised at how well this worked
As per the title. I'm generally alright with basic car maintenance, but I'd never used something like this before. Works so well, blvery impressive
Trustpilot
1 month ago
1 month ago