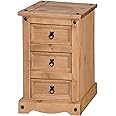
ποΈ Sleep in Style with the Corona Bedside!
The Mercers Furniture COR109 Corona 3 Drawer Bedside in Brown combines timeless design with practical functionality. Crafted from solid Mexican pine and featuring an antique wax finish, this narrow bedside cabinet is perfect for any bedroom. With three spacious drawers and easy self-assembly, itβs the ideal blend of style and convenience.
Colour | Brown |
Product Dimensions | 33 x 35 x 58 cm; 7.72 kg |
Is assembly required | Yes |
Assembly type | Already Assembled |
Primary material | Pine |
Type of wood | Pine Wood |
Top material | Pine Wood |
Finish type | Waxed |
Style | Narrow Bedside |
Capacity | 35x33x58 cm |
Number of pieces | 1 |
What is in the box? | 3 drawer bedside cabinet |
Publisher code | MESH3 |
Number of boxes | 1 |
Shipping weight | 7.72 Kilograms |
Item Model Number | COR109 |
Manufacturer | Mercers Furniture |
Item model number | COR109 |
ASIN | B01CGF5GAU |
K**Y
Excellent value, pleasingly good looking, stable and useful.
We chose this cabinet because it is the correct height for a bedside lamp to sit on and shine down onto a book for comfortable bedtime reading.From our experience, to assemble the cabinet, you will need:A long handled screwdriverA soft hammerA flat bladed screwdriverA pencil+ an average level of DIY ability.The instructions don't mention glue but really the whole thing would be a lot stronger if it were glued together during construction.We didn't follow the slightly intimidating instruction sheet, just used common sense. It took a handy chap one and a half hours to make it in a careful and leisurely fashion. We did buy two and the second one only took 45 minutes - this time a power screwdriver was very helpful, and this second time we glued it all together.Firstly he laid it all out on the floor to check through. We decided against using the enclosed round black decorative studs as we liked the look of the finished article without them.Unluckily for us, when we unpacked this bedside cabinet one small part was cracked and broken away from the piece. However we glued it together successfully; it was part of the drawer so not too important. I read from other reviewers that there wouldn't be a problem getting a replacement part but it seemed easier just to mend it there and then.It is a rough and ready item, as even after careful attention some joints just won't fit well, they gape a little. It was declared less easy to make than some Swedish flat pack furniture can be. It's not MDF though, being proper wood, dark pine, apart from the back panel, and the black metal fittings are attractive. I was happy as they perfectly matched a desk I had bought some while ago; do take a look at the image I have posted above of the two items together.Now complete and in position I am really pleased with the cabinet. I gave it a generous treatment with beeswax polish. The cabinet is heavy and solid; no reason why it shouldn't stay where it is being serviceable and attractive to look at for years to come. Even with the niggles I have described I still think it is worth 5 *s as it was so inexpensive and yet when made really looks to be worth more.
J**Y
Solid little cabinet
Good solid little cabinet. It was a bit tricky putting it together and this is not my first flat pack. But if you do it well and take the time, it's worth the effort. Everything fitted well, all joins are effectively screwed, so no need to use any wood glue. I only used some for the draw bottoms and the cabinet back, just for the extra support. All round, good quality, no missing parts, no damage. Well recommended.
J**S
It's ok. For the price it is acceptable.
This is a sort of review but mostly it is a couple of tips and advice that might help you put it together a little easier than the instructions advise.The cabinet is very nice once put together, it's not made from the best quality timber, it is soft, but it looks pretty good and feels sturdy once put together properly. For the price I cannot really complain about it. There are however some issues with the construction if this cabinet I'd like to share here in the hope that it might help anyone purchasing one.So here are some tips on changes and care you should make through certain stages of the instructions for putting this together. It will make life a lot easier as you progress. Also there some additional things you could do that will help as well as getting wood glue (as none is supplied) and a cordless drill with a narrow bit to drill shallow pilot holes which it does not say to do in the instructions. Also you might want to get some rough sandpaper ready and a sanding block too (though this is just a suggestion).I definitely advise that you absolutely do pre-drill shallow pilot holes for ALL screws and glue ALL dowels.SIDES & DRAWER RUNNERS:Section 1This section misleadingly makes you think that you need parts 6, 7 and 9 for this section, you do not, you will need parts 6 & 7 for section 2 and part 9 for section 3, but I suggest you fix and glue the dowels into all of them ready for use later. I also strongly suggest getting all part 8 (x6) pieces and 12xB screws (from section 7) and do the same to those as you are better off fitting them here in section 1, than in section 7 as instructed.My reasoning? It was at stage 7 where I realised there was an issue with the order of the instructions. And it was where I learnt I should have used a drill to pre-drill shallow pilot holes for ALL the screws at the same time, not just those in stage 7. I had a really hard job in the cramped space screwing the drawer runners down whilst on section 7. If I'd had a shorter screwdriver it might have helped but the pilot holes definitely would have helped regardless. It's so cramped inside it by the time stage 7 is reached. My DeWalt cordless would not fit in there to drill the holes either and there simply is not enough room to get an arm in there to tighten the screws, it has to be done through the drawer openings etc.....So, in section 1, after hammering in the plastic lugs (J), pre-drill shallow holes through their screw holes into the sides to aid you with screwing the drawer separators on in section 3, do not drill right through, 5 mm will be fine.The instructions will tell you to put on the part 8(x8) drawer runners onto the insides of the sides in stage 7. Don't do this - put them in here, at stage 1 as otherwise, like me, you would have an awkward, if not hard job screwing them in. Make sure to use glue on the dowels as well - and pre-fill 5 mm pilot holes and screw them in really, really tight because if you don't get them completely flush to the sides when it's put together the drawers won't slide in easily or may even not go in at all. I also suggest sanding these runners and their top and bottom edges a little to aid in sliding/clearance, as even after doing it this way the top drawer on my first cabinet was still stiff to slide.FRONT DRAWER SEPARATORSSection 2I nearly made a mistake here, all the parts 6 (x1) and 7 (x3) are identical to look at in size. But part 6 has two pre-drilled holes. I nearly put this in the wrong place - it has to go on the bottom of the number 4 pieces (not flush with the top). The holes in this piece are to screw it onto the bottom/front plinth, there are no dowels to guide you on the 3 plinth parts.SECTION 7If you've done as above section 7 will be no longer necessary.DRAWERSSection 9This is where the price of this unit shows. There are no dowels to guide your fitting at all in the drawers with regard to fixing them together. It is all held together by screws (24xI) so can be fiddly to get done without leaving gaps or having the sections drop below the drawer front bottom edge if you are on your own and have no vice, which is what I had to do.I suggest a vice or some helping hands to hold parts flush and tight while you pre-drill pilot holes through the guide holes that are in the sides.Line up the drawer base groove in each of the sides (one side at a time of course) with that on the drawer front, making sure that the bottom of the side also does not drop below the front bottom edge of the front. (you will probably notice here that the alignment of the groove goes out a little but there is plenty of tolerance so it will be fine). Pre-drill the pilot holes, 10-15 mm through the guide holes in the side piece and screw in. I used glue here as well. Once you slide in the hardboard base do exactly the same for the back part.The rest and sections not mentioned here are basically as is.Basically these are the things I learnt from putting the first of these units together. I bought two of these, the second one was a lot easier to do than the first by doing the above, mainly because of incorporating section 7 into section 1. And using pre-drilled pilot holes.The cabinet is sturdy, looks good, I never used the black furniture parts, I got wooden knobs for the drawers as I prefer them
Trustpilot
5 days ago
1 week ago