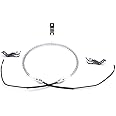
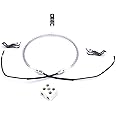
![UNIVERSAL HALOGEN OVEN COOKER HEATING ELEMENT BULB with 3x Clips (1200/1400w) - -22CM LEADS- S4U® [Energy Class A]](https://m.media-amazon.com/images/I/31Ch2B07pDL.jpg)


💥 Light Up Your Kitchen Experience!
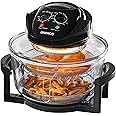
The S4U® Universal Halogen Oven Cooker Heating Element Bulb is a premium quality replacement part designed for 1200W and 1400W mini halogen ovens. With a lead length of 22cm and compatibility with most 12-17 litre ovens, this bulb ensures efficient cooking with ease of installation thanks to its included clips.
| Brand | S4U |
| Model Number | S4U-HAL-OVN-BLB |
| Product Dimensions | 1.5 x 17.5 x 1.5 cm; 55 g |
| Auto Shutoff | No |
| Special Features | Halogen |
| Item Weight | 55 g |
I**
👍
Replacement heating element worked perfectly👍 it also saved me buying another air fryer 😁
J**D
Fixed
Arrived quickly well packed easy to fix with brackets a very reasonable price looks well made good wattage frier back to new.
T**G
Requires electrical skills to fit.
Needs strip down of cooker to fit.Not a 'plug and play' replacement, fitter needs electrical splicing skills.Works well once fitted.
A**L
Repair Halogen Oven
Taking the oven's working parts apart is time consuming as the quality of the screws is less than ideal.Be very careful to make notes of the order it comes apart, ideally get someone to video or photograph the sequence.The nut that holds the fans on the motor spindle is left-hand thread, so turn it the way you would normally tighten it, when taking it all apart.Have a good look at how the thermal trip fits before undoing it. This is the part the temperature knob fits on. It is essential that you get it back in place accurately so as not to block the bi-metallic strip.You'll also need connectors for the wires - I used the proper crimped nylon caps. I found it easier to tie each pair of wires together with cable ties before trying to crimp them.I also had to do some de-rusting of the metal plates inside.Allow plenty of time and a good clear space. Have a deep bowl to hand with a sheet of kitchen roll in the botton to put all the fasteners in; if you don't they'll scatter everywhere & you'll spend hours searching for them. The timer and temperature knobs are just eased off, each only fits one way.Tools required to do it properly: small screw drivers; small spanners; ideally small sockets for the hex fasteners; wire side cutters; wire strippers; ratchet crimper; crimp-on caps to join wires.I've done it twice & it's well worth doing, but likely beyond the skills and tool kits and confidence of throw-away addicts, which is a shame.
R**Y
Absolutely perfect.
Brilliant, so much cheaper than others and works perfectly. The oven is like new again.
J**S
All good 👍
All good 👍
W**Y
Lasted a month
Fit perfectly but only lasted a month.
S**E
It would work
Pleased with delivery and packingI am just disappointed that in trying to save my Halogen I am unable to fix the bulb in myself.So for me a waste of money, but maybe for someone else it wouldn't be.
Trustpilot
1 day ago
1 month ago