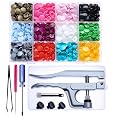
✨ Snap into Style with KAM Snaps! ✨
The Original KAM Snaps Starter Fasteners Kit includes 360 size 20 snaps in 12 colors, along with essential tools like pliers and dies, all designed for safe, durable, and easy crafting.
| Color | 360 set T5 snaps + Plier |
| Material | Plastic |
| Brand | Seawhisper |
| Head Style | Cap |
| Recommended Uses For Product | Diapers, Craft |
| Unit Count | 1 Count |
| Item Weight | 1.63 pounds |
| Package Dimensions | 9.17 x 6.06 x 2.8 inches |
| Item model number | 4337005988 |
| Is Discontinued By Manufacturer | No |
| Weight | 1.23 Pounds |
R**O
Good kit- make SURE the thickness of fabric is LESS than 2mm
This is a great starter kit. There is an impressive selection of snaps and the tools are good.Before getting this kit, I had never installed any snaps. The instructions coming with the kit are short, clear and complete: you can’t miss. A couple trouble shootings are included. Everything is covered.The kit comes in two plastic boxes: one for the snaps and one for the tools. The box for the snaps is good, but the box for the tools is flimsy: it doesn’t close properly. That’s a minor flaw, I can still put the tools back inside but it should be better.One WARNING. I bought this kit for a sewing project requiring snaps to be applied to 2 layers of faux leather. The “official” two layers combined thickness was 2 mm... But it wasn’t quite so.When fixing a snap, you pressure two pieces together: one piece has a flat head and a pin and the other is a “male” or a “female” snap.Well, the 2 snap pieces didn’t stay together on the two layers of faux leather. No matter how hard I pressed with the pliers, they fell apart !! Trouble shooting said that when this occurred, it was because the fabric was thicker than 2mm and you needed LONGER pins, not included in this kit !!Oh boy. I didn’t expect that (I thought I was within the thickness limit).I couldn’t afford the delay/trouble of ordering the same snap colours with longer pins and wait for another long delivery. So I’m going to tell you what I did to get out of this situation.I decided to try reducing the thickness of the fabric by removing one layer on the underside, just enough for the snap piece.1-To do a neat job, I used one of the “extra” DIE included in the kit as a template and drew a circle around it at the exact emplacement with an erasable marker.2-using small, sharp manicure scissors, I made a small incision BETWEEN the two layers in the center of the circle3-I carefully cut 2-3 mm INSIDE the circle ⭕️, between the layers, parallel to the circle line all the way around and removed that small circle.4- I tried the snap piece for fit (perfect fit)5- I marked the center of the now one layer faux leather fabric pricked it with the tool then put the top snap pin piece through.6- I used the pliers to press the two pieces together and bingo: the pieces fit perfectly and don’t fall apart, and once the pieces are in, you can hardly see any trace of the “surgery”.Success depends on three things:First, make sure your fabric is LESS than 2mm thick.Second, make sure the PIN piece is completely imbedded (hidden/swallowed) inside the black DIE before closing the pliers and applying force.Third, read the instructions(!) they are short & well written.This is a wonderful kit that you will enjoy using.
S**A
Very nice snap closures
I read about these plastic snaps on a sewing website--how useful they were and relatively easy to use. The main application I was interested in was for baby clothes.This kit has everything you need. You get the pliers, additional tools, and a nice assortment of snap colors. Attaching a snap is very easy. You have a cap and a socket and then a corresponding cap and stud for the other side of your item. Instructions are clear about how to place the snap pieces in the pliers. Just be careful as you do this, but it really isn't hard.The hardest part for me is making sure that you are attaching the snaps to the proper position on your item. I found these KAM snaps to be easier to use than the metal ring type snaps and Dritz pliers. The kit comes with an awl to punch a hole. You poke the pointy part of the cap through this hole and then lay the socket or stud gently over the cap point. Gently place the cap onto the black part of the pliers. Make sure everything is positioned properly and squeeze firmly! That's pretty much it. Do read the instructions for the details.They turned out really cute on the baby clothing. I used them on the shoulders of a quilted sleep sack, the front of an infant gown, and the crotch area of a romper. So far I think I've only used the white ones, but the colored ones are really cute, too. You can order more snaps from KAM. They do come in other sizes. The included size is "20", considered the most popular size.Do be careful, as it is difficult to remove a snap but not impossible. KAM has a tool, and that would make sense if you are really installing a lot of these. However, you can find some information on YouTube about how to remove a snap without this special tool. I have had to do it once when I damaged a stud. I was able to replace the snap fine.
S**I
Easy to use and great results
Great product, easy to use, snaps look great on the clothes.
S**T
Worked fine
Some of the reviews claim that these don’t work, won’t clamp tightly to the fabric etc but I used them on a 3 layer fabric sandwich (flannel, interfacing and muslin and they worked fine. they were a lot easier to use than the hammer on ones that I have used before where if you hit is crooked, the snap does not sit right.So far they are fine.
Trustpilot
1 day ago
2 weeks ago