🧱 Elevate your walls, elevate your space—peel, stick, and impress!
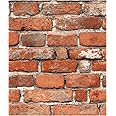
Astaowl’s 3D Wall Panels offer 10 peel-and-stick PVC panels with realistic brick texture, waterproof and oil-proof finish, designed for easy DIY installation. Perfect for adding a stylish, durable, and safe decorative touch to any room from kitchens to offices.
| Brand | Astaowl |
| Material | Polyvinyl Chloride (PVC) |
| Size | 10 PCS |
| Color | Black Rock |
| Finish Type | Textured |
| Installation Type | Peel and Stick |
| Product Dimensions | 1"L x 1"W |
| Pattern | Brick, Marble |
| Item Weight | 0.46 Kilograms |
| Shape | Square |
| Item Thickness | 0.16 Inches |
| Form Factor | Square, Ridged, Smooth Back |
| Water Resistance Level | Waterproof |
| Manufacturer | Astaowl |
| Part Number | 3D Wall Panels |
| Item Weight | 1.01 pounds |
| Country of Origin | China |
| Item model number | 3D Wall Panels |
| Finish | Textured |
| Number Of Pieces | 10 |
N**L
Looks great, easy to use. Have already bought more and will buy a few more soon.
I'm turning my tiny office into a streaming room and needed something to cover the disgusting walls and to create an ambiance. When I saw these tiles come up for review, I was very excited because they were exactly what I was looking for and had something very similar in my shopping cart already. These come with ten tiles, which was enough to set up the camera-visible area of my setup and to give a proper try before buying at least six more bundles to cover that whole wall.The tiles arrived quick, clean, and flat without any damage. The backing is easy to peel off and the adhesive foam on the back is very sticky (and it WILL come off onto your fingers if you touch it). The repeating pattern makes it easy to line these up.The tiles interlock well and are easy to line up, but it is very sticky and easy to stick the tile to the wall too soon and need to reposition it... which can be tricky. I suggest working with a helper and having your space cleared so you can properly position yourself while you work. I was working over and around things and my wall has very visible imperfections... but it is good enough for what I am doing and still looks a million times better than the stained wall from the previous occupant of my room.While I was hanging up the tiles, I temporarily left a few of the nails in the wall above where a row of tiles were going to land so I could see how my decor would actually look against the stones and that was very helpful with confirming my color scheme. I naturally pulled the nails out before continuing to hang tiles but am very glad that I did that because my original plan had a black and pink color scheme and actually seeing the pink board hanging against the tiles while being able to walk around the room and see different angles and the different lighting options made me realize that purple and black with the tiles was the way to go. When setting the stack of tiles on the table and just putting decor items on top of and next to them, the pink was the winner... but hanging and with lighting purple is the best. This was a long way of saying that you'll probably want to physically see the tiles in your space before committing to decor.I am very happy with the tiles. I bought a second bundle the day that I got the review bundle after hanging them up and seeing how they looked and how strong the adhesive is. I'll need five to seven more bundles to fully cover my wall, but the most crucial area is covered and I'll get them one by one as funds for non-essential items allow.
H**C
Easy application and looks reasonable well.
Say what you may for an otherwise cheesy wall panel but the ease of use, looks reasonable well and easily customizable make this a plus for a regular man cave. Now someone with a nice size budget may point out the cheesy part but then the key point is the budget. Without causing an arm and a leg, I am very happy with the reasonable result with some sound proving qualities for a budget oriented/constrained man cave. Now more $ for toys….lol
A**D
Tips for installation
To start with - no one is mistaking these for real bricks, maybe from afar, with some bad eyesight, but just be aware of this before deciding how you want to use these.For reference I used the red bricks and placed about 30 sq/ft of these in a very infrequently used place, mounting them to plywood walls, and using trim on corners and edges.Big picture:These bricks are really small (much smaller than would be used for real). The mounting is really challenging to get straight on a long line. 1 tile did "crack" the vinyl tore while being mounted when the entire tile wasn't flat - while trying to smooth it out it pinched and tore.TIPS for Install:Get a paper cutter, and some painters tape.Tape off each line as you go as the edges on these are not precise, and it's easy with the foam back to get off line.I really hated the extra wide seams between each time (you can see it in the pictures) so for vertical placement I used a paper cutter and trimmed one edge all the way to the brick then lined it up - this made it look WAY BETTER vertically. There was no double seams every foot. Horizontal placement was a bit more challenging. I tried seaming up 2 tiles entirely and it looks ok, but pretty unnatural. Ultimately I did a similar trim on one side and butt it up approach. The challenge is that the vertical line still shows, although it is much narrower now.Staggering these did not help. the vertical line for 1 foot at uneven intervals looked worse.Start from an edge that you align then press down. The adhesive was ok. Some started to come off wall (and this was in a constant 70 degree low humidity environment), overnight, but most seemed to stay on. I did end up using brad nailer and some tacks to affix a few weak spots, but what is holding up most of these I think is the trim I placed over corners and edges.I'd say this is more for projects than serious decor. I can definitely see using this in our haunted house, but it was really challenging to make look ok.
Trustpilot
1 day ago
5 days ago